Introduction
Creamy Chocolate Ice Cream is one of the most loved frozen desserts in the world. Rich, smooth, and packed with deep chocolate flavor, this homemade ice cream is perfect for hot summer days, family gatherings, birthday parties, or whenever you crave a sweet treat. Unlike many store-bought versions, homemade chocolate ice cream allows you to control the quality of ingredients, sweetness level, and texture.
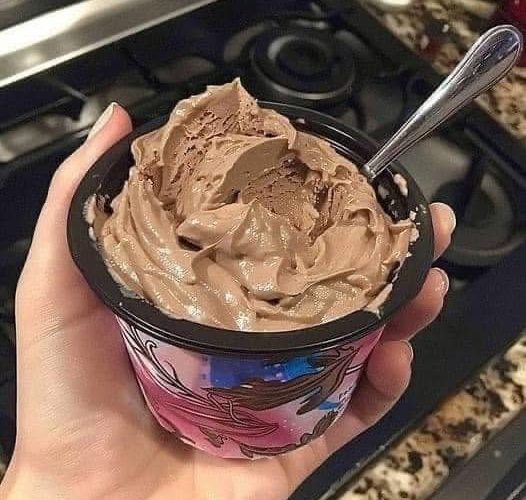
The ice cream shown in the image looks incredibly creamy and luscious, with a soft scoopable texture that melts beautifully in every bite. This recipe will help you create a similar chocolate ice cream at home using simple ingredients and easy-to-follow steps.
Why You’ll Love This Recipe
- Rich chocolate flavor
- Ultra-creamy texture
- Easy to prepare
- No artificial preservatives
- Perfect for kids and adults
- Can be customized with toppings and mix-ins
Preparation Time
- Preparation Time: 20 minutes
- Chilling Time: 4–6 hours
- Freezing Time: 6–8 hours
- Total Time: Approximately 10–14 hours
Yield
Serves 6–8 people
Ingredients
For the Ice Cream Base
- 2 cups heavy cream
- 1 cup whole milk
- ¾ cup granulated sugar
- ½ cup unsweetened cocoa powder
- 150 grams dark chocolate, chopped
- 4 egg yolks
- 1 teaspoon vanilla extract
- ¼ teaspoon salt
Optional Mix-Ins
- Chocolate chips
- Crushed cookies
- Brownie chunks
- Caramel swirls
- Chopped nuts
Equipment Needed
- Mixing bowls
- Whisk
- Saucepan
- Fine mesh strainer
- Ice cream maker (optional)
- Freezer-safe container
- Rubber spatula
Step 1: Prepare the Chocolate Mixture
Place a saucepan over medium heat.
Add:
- Whole milk
- Heavy cream
- Cocoa powder
Whisk continuously until the cocoa powder dissolves completely.
Add the chopped dark chocolate and stir until melted and smooth.
The mixture should become silky and glossy.
Step 2: Mix Egg Yolks and Sugar
In a separate bowl:
- Add egg yolks
- Add granulated sugar
Whisk vigorously until the mixture becomes pale yellow and slightly thick.
This process helps create the rich custard base that gives the ice cream its creamy texture.
Step 3: Temper the Eggs
Slowly pour about one cup of the warm chocolate mixture into the egg yolks while whisking continuously.
This prevents the eggs from scrambling.
Gradually add more warm mixture while stirring.
Once combined, pour everything back into the saucepan.
Step 4: Cook the Custard
Place the saucepan on low heat.
Stir constantly with a wooden spoon or spatula.
Cook until the custard thickens slightly and coats the back of a spoon.
Do not boil.
The ideal temperature is around 170–175°F (77–80°C).
Step 5: Add Flavorings
Remove from heat.
Add:
- Vanilla extract
- Salt
Mix thoroughly.
The vanilla enhances the chocolate flavor while the salt balances sweetness.
tep 6: Strain the Mixture
Pour the custard through a fine mesh strainer into a clean bowl.
This removes any small lumps and ensures an extra-smooth ice cream.
Step 7: Chill Completely
Cover the bowl with plastic wrap.
Place in the refrigerator for at least 4–6 hours or overnight.
A well-chilled base freezes more evenly and creates a creamier texture.
Step 8: Churn the Ice Cream
If using an ice cream maker:
Pour the chilled mixture into the machine.
Churn according to manufacturer instructions.
Usually, this takes 20–30 minutes.
The ice cream will resemble soft-serve when ready.
Step 9: Add Mix-Ins
During the last few minutes of churning, add:
- Chocolate chips
- Cookie pieces
- Brownie chunks
Mix gently.
Step 10: Freeze
Transfer the churned ice cream to a freezer-safe container.
Smooth the top using a spatula.
Cover tightly.
Freeze for 6–8 hours until firm.
No Ice Cream Maker Method
If you don’t own an ice cream maker:
- Pour chilled mixture into a freezer-safe container.
- Freeze for 1 hour.
- Remove and stir vigorously.
- Repeat every 30–45 minutes for 4–5 hours.
This helps break up ice crystals and improves texture.
Tips for Perfect Chocolate Ice Cream
Use Quality Chocolate
The better the chocolate, the richer the flavor.
Choose chocolate containing at least 60–70% cocoa.
Chill Thoroughly
Never skip chilling.
A cold base freezes faster and produces smaller ice crystals.
Avoid Overcooking
Custard that gets too hot may curdle.
Cook gently over low heat.
Store Properly
Keep the container tightly sealed to prevent freezer burn.
Delicious Topping Ideas
Chocolate Sauce
Warm chocolate sauce creates a wonderful contrast against cold ice cream.
Whipped Cream
Adds lightness and extra creaminess.
Fresh Strawberries
Chocolate and strawberries are a classic pairing.
Crushed Oreos
Provides crunch and extra sweetness.
Roasted Nuts
Almonds, pecans, or hazelnuts work beautifully.
Caramel Drizzle
Adds buttery richness.
Flavor Variations
Double Chocolate
Add:
- Extra chocolate chips
- Chocolate chunks
for maximum chocolate flavor.
Mocha Chocolate Ice Cream
Add:
- 1 tablespoon instant espresso powder
to intensify the chocolate taste.
Mint Chocolate
Add:
- ½ teaspoon mint extract
for a refreshing twist.
Chocolate Peanut Butter
Swirl peanut butter into the churned ice cream before freezing.
Rocky Road
Mix in:
- Marshmallows
- Almonds
- Chocolate chunks
Nutritional Information (Approximate Per Serving)
- Calories: 320
- Carbohydrates: 28g
- Protein: 5g
- Fat: 22g
- Saturated Fat: 13g
- Sugar: 24g
- Fiber: 2g
Values may vary based on ingredients used.
Common Mistakes to Avoid
Not Chilling the Base
Warm mixture creates icy ice cream.
Using Low-Fat Ingredients
Fat contributes to creaminess.
Skipping Stirring
For no-churn versions, stirring is essential.
Freezing Uncovered
This can cause freezer burn and unwanted odors.
Serving Suggestions
Serve your creamy chocolate ice cream:
- In waffle cones
- In dessert bowls
- Alongside brownies
- With chocolate cake
- As an ice cream sandwich filling
- With fresh fruit
- With warm cookies
Storage Instructions
Store in an airtight container.
Keep frozen for up to 2 weeks for best flavor and texture.
Place a piece of plastic wrap directly on the surface before sealing to reduce ice crystal formation.
