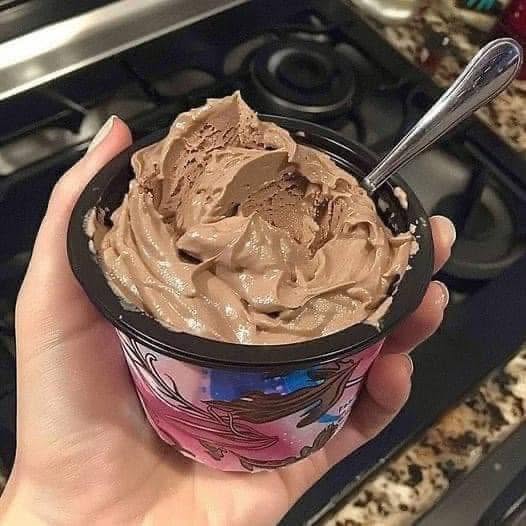
There is something truly satisfying about enjoying a bowl of homemade creamy chocolate ice cream that is made from fresh, high-quality ingredients. This classic frozen dessert has remained a favorite around the world because of its rich chocolate flavor, silky texture, and refreshing taste. Whether you are preparing a sweet treat for a summer afternoon, celebrating a birthday, serving dessert at a family gathering, or simply satisfying a chocolate craving, this homemade chocolate ice cream recipe delivers excellent results every time. Unlike many commercially produced ice creams that often contain artificial flavors, preservatives, and stabilizers, making chocolate ice cream at home allows you to control every ingredient while creating a dessert that is fresher and more flavorful. The combination of heavy cream, whole milk, cocoa powder, dark chocolate, egg yolks, and vanilla extract creates a luxurious frozen dessert with a creamy consistency that melts smoothly in every bite. This easy chocolate ice cream recipe is suitable for beginners as well as experienced home cooks, making it one of the best homemade chocolate desserts for every occasion.
Why Homemade Chocolate Ice Cream Is Better Than Store-Bought
Preparing homemade chocolate ice cream offers several advantages that make the extra effort worthwhile. One of the biggest benefits is complete control over the ingredients. You can use premium-quality dark chocolate, fresh dairy products, and natural vanilla extract without worrying about unnecessary additives or artificial preservatives. The result is a richer chocolate flavor and a noticeably smoother texture. Homemade ice cream also allows you to adjust the sweetness according to your personal preference while experimenting with different mix-ins and toppings that suit your family’s taste. Another advantage is freshness. Every batch is made specifically for your household, ensuring maximum flavor and creaminess. This recipe also provides flexibility because it can be prepared with or without an ice cream maker. Whether you enjoy classic chocolate ice cream or prefer exciting additions like chocolate chips, brownie pieces, cookie crumbs, or caramel swirls, homemade chocolate ice cream gives you endless opportunities to create a personalized frozen dessert that tastes far superior to many store-bought alternatives.
What Makes This Chocolate Ice Cream Exceptionally Creamy
The secret behind a perfectly creamy chocolate ice cream lies in achieving the right balance of ingredients and carefully following each preparation step. Heavy cream contributes a rich source of butterfat, which creates a smooth mouthfeel and reduces the formation of large ice crystals during freezing. Whole milk provides additional creaminess while maintaining a balanced consistency that is neither too heavy nor too light. Egg yolks play an equally important role because they create a custard base that naturally thickens the mixture and produces an incredibly silky texture. Unsweetened cocoa powder provides deep chocolate flavor, while chopped dark chocolate melts into the warm dairy mixture to create richness and complexity. Vanilla extract enhances the chocolate without overpowering it, and a small amount of salt helps balance the sweetness while intensifying the cocoa flavor. When these ingredients are cooked gently, strained carefully, chilled thoroughly, and frozen correctly, they create a homemade chocolate ice cream with a luxurious texture that remains creamy even after several days in the freezer.
Essential Ingredients That Create Outstanding Chocolate Flavor
Every ingredient included in this recipe has an important purpose in producing the best homemade chocolate ice cream. Heavy cream forms the rich foundation that gives the dessert its luxurious texture. Whole milk lightens the mixture just enough to keep it smooth and scoopable. Granulated sugar not only sweetens the ice cream but also influences its texture by lowering the freezing point, helping maintain softness after freezing. Unsweetened cocoa powder delivers an intense chocolate taste while dark chocolate adds richness, depth, and a velvety finish that cocoa powder alone cannot achieve. Egg yolks provide natural emulsification, helping the fat and liquid combine into a stable custard that freezes evenly. Vanilla extract complements the chocolate with subtle warmth, while a small amount of salt enhances every flavor without making the dessert salty. Optional mix-ins such as chocolate chips, crushed cookies, brownie chunks, caramel swirls, or chopped nuts can be added to create exciting flavor combinations while preserving the creamy chocolate base that makes this dessert so enjoyable.
Preparing Your Kitchen Before You Begin
Organizing your workspace before making homemade chocolate ice cream makes the entire process easier and more enjoyable. Gather all ingredients in advance and measure each one carefully to avoid interruptions while cooking the custard. Having your saucepan, whisk, mixing bowls, fine mesh strainer, rubber spatula, freezer-safe container, and ice cream maker ready allows every step to flow smoothly. If you are using an ice cream maker, ensure that the freezer bowl has been frozen according to the manufacturer’s instructions before you start preparing the recipe. Clean equipment is equally important because even small traces of moisture or residue may affect the texture and consistency of the finished dessert. Chilling the mixing bowl that will hold the finished custard can also help cool the mixture more quickly before refrigeration. Taking a few extra minutes to organize your kitchen helps reduce stress and allows you to focus on creating a smooth, creamy chocolate ice cream with consistent results from beginning to end.
Creating the Rich Chocolate Base
The first stage of preparing this homemade chocolate ice cream involves creating a smooth and flavorful chocolate mixture that serves as the foundation of the recipe. Begin by placing a saucepan over medium heat before combining the whole milk, heavy cream, and unsweetened cocoa powder. Whisk continuously to ensure the cocoa powder dissolves completely without leaving dry lumps behind. Once the cocoa has blended evenly into the dairy mixture, gradually add the chopped dark chocolate while stirring constantly until every piece has melted. As the chocolate melts, the mixture transforms into a glossy, silky liquid with a deep chocolate aroma that signals the beginning of an exceptional dessert. Maintaining moderate heat throughout this process prevents scorching and allows the chocolate to melt gently without separating. A smooth chocolate base ensures that the finished ice cream has an even flavor throughout every scoop while creating the luxurious texture that homemade chocolate ice cream is known for.
One of the defining features of premium homemade chocolate ice cream is its custard base. While this step may seem advanced, it is actually straightforward when performed patiently. Begin by whisking the egg yolks together with the granulated sugar until the mixture becomes pale in color and slightly thickened. This process helps dissolve the sugar while incorporating air, creating a lighter and smoother custard. Next comes tempering the eggs, an essential technique that prevents them from cooking too quickly. Slowly add a small amount of the warm chocolate mixture into the egg yolks while whisking constantly, allowing the temperature to rise gradually. Continue adding more of the warm mixture before returning everything to the saucepan. Cook the custard gently over low heat, stirring continuously until it thickens enough to lightly coat the back of a spoon. Avoid boiling, as excessive heat can cause the eggs to curdle and produce a grainy texture. Once the custard reaches the proper consistency, remove it from the heat and stir in the vanilla extract and salt. These final additions enhance the chocolate flavor while creating a perfectly balanced taste that will remain noticeable even after freezing.
Why Straining and Chilling Are Essential Steps
Although it may be tempting to move directly from cooking to freezing, properly straining and chilling the custard makes a remarkable difference in the finished dessert. Passing the warm mixture through a fine mesh strainer removes any tiny bits of cooked egg or undissolved cocoa, leaving behind an exceptionally smooth ice cream base. Even if the custard appears flawless, this simple step guarantees a silkier texture. After straining, cover the surface of the custard with plastic wrap so it touches the mixture directly. This helps prevent a skin from forming while the mixture cools. Refrigerate the custard for at least four to six hours, or preferably overnight, allowing every ingredient to fully combine and develop a deeper chocolate flavor. A thoroughly chilled base freezes more efficiently, resulting in smaller ice crystals and a much creamier consistency. Skipping this important stage often leads to icy, less flavorful ice cream, making patience one of the most valuable ingredients in this recipe.
Churning the Ice Cream for a Light and Creamy Finish
Once the chocolate custard has chilled completely, it is ready to be transformed into delicious homemade chocolate ice cream. If you have an ice cream maker, pour the cold mixture into the machine and churn according to the manufacturer’s instructions. During churning, the mixture incorporates air while freezing gradually, creating the soft, creamy texture associated with premium ice cream. Most machines complete this process within twenty to thirty minutes, producing a consistency similar to soft-serve. During the final few minutes, optional mix-ins such as chocolate chips, crushed cookies, brownie chunks, caramel swirls, or chopped nuts can be folded into the mixture for extra texture and flavor. After churning, transfer the ice cream into a freezer-safe container, smooth the surface with a spatula, and seal it tightly before freezing for several more hours until firm. This final freezing period allows the dessert to develop the scoopable texture expected from traditional chocolate ice cream.
Easy Homemade Chocolate Ice Cream Without an Ice Cream Maker
Not having an ice cream maker should never prevent anyone from enjoying homemade chocolate ice cream. This recipe can easily be prepared using a freezer-safe container and a little extra attention during the freezing process. Once the custard has chilled completely, pour it into a shallow container and place it in the freezer. After about one hour, remove the container and stir the mixture thoroughly using a sturdy spoon, whisk, or spatula. Repeat this process every thirty to forty-five minutes for approximately four to five hours. Each round of stirring breaks apart developing ice crystals, gradually creating a smoother consistency that closely resembles churned ice cream. While the final texture may not be identical to machine-churned ice cream, the results are still wonderfully creamy, rich, and satisfying. This simple alternative makes homemade chocolate ice cream accessible to anyone, regardless of kitchen equipment.
Delicious Flavor Variations to Try
One of the greatest advantages of homemade chocolate ice cream is the freedom to create new flavor combinations while keeping the original recipe intact. Chocolate lovers can prepare a double chocolate version by adding extra chocolate chips or chopped chocolate near the end of the churning process for even more richness. Coffee enthusiasts can stir in one tablespoon of instant espresso powder during the heating stage to create a mocha chocolate ice cream with a deeper cocoa flavor. A refreshing variation can be achieved by adding half a teaspoon of mint extract after cooking the custard, producing a classic mint chocolate dessert that pairs beautifully with chocolate chips. Peanut butter fans may gently swirl creamy peanut butter through the churned ice cream before freezing, creating ribbons of nutty flavor throughout every scoop. For a rocky road-inspired version, fold marshmallows, chopped almonds, and chocolate chunks into the finished mixture. These simple additions allow one dependable recipe to produce a wide variety of frozen desserts suitable for different occasions and personal preferences.
Best Ways to Serve Homemade Chocolate Ice Cream
Serving homemade chocolate ice cream creatively can make an already delicious dessert even more memorable. Freshly scooped chocolate ice cream tastes wonderful in crisp waffle cones, sugar cones, or chilled dessert bowls. It also pairs beautifully with warm brownies, chocolate cake, freshly baked cookies, and soft chocolate chip muffins, creating an irresistible contrast between warm and cold textures. Fresh strawberries, raspberries, or sliced bananas provide natural sweetness and balance the richness of the chocolate. Chocolate sauce, whipped cream, caramel drizzle, roasted almonds, pecans, hazelnuts, or crushed chocolate cookies can be sprinkled over each serving for additional flavor and visual appeal. This creamy dessert can even be used as a filling for homemade ice cream sandwiches or served alongside fruit-based desserts for a refreshing finish. Whether presented simply or dressed with elegant toppings, homemade chocolate ice cream always delivers an impressive dessert experience.
Even though homemade chocolate ice cream is simple to prepare, a few common mistakes can affect the final texture and flavor. One of the most frequent errors is rushing the chilling process. A warm or partially cooled ice cream base does not churn properly and often creates large ice crystals that make the dessert less creamy. Another mistake is overheating the custard. The mixture should never reach a full boil because high temperatures can cause the egg yolks to curdle, resulting in a grainy consistency instead of a smooth custard. Using low-fat dairy products is another issue, as the rich texture of traditional chocolate ice cream depends on the fat content of heavy cream and whole milk. When preparing the recipe without an ice cream maker, forgetting to stir the mixture regularly during freezing can also lead to an icy texture. Finally, storing the finished ice cream in a loosely covered container allows air to enter, causing freezer burn and reducing the quality of the dessert. Paying attention to these details helps ensure that every batch remains creamy, flavorful, and enjoyable.
Storage Tips for Long-Lasting Freshness
Proper storage is essential for preserving both the flavor and texture of homemade chocolate ice cream. Once the ice cream has finished freezing, transfer it to an airtight freezer-safe container if it is not already stored in one. Before placing the lid on the container, press a piece of plastic wrap directly against the surface of the ice cream. This extra layer helps reduce exposure to air, minimizing the formation of ice crystals and preventing freezer burn. Store the container in the coldest part of your freezer instead of the freezer door, where frequent temperature changes occur every time the door is opened. For the best flavor and texture, enjoy the ice cream within two weeks. Although it may remain safe to eat beyond that period when properly frozen, its creamy consistency and rich chocolate taste are at their best during the first couple of weeks. Allow the container to sit at room temperature for a few minutes before scooping, making it easier to serve smooth, beautifully shaped portions.
Notes for the Best Homemade Chocolate Ice Cream
Small details often make the biggest difference when preparing homemade frozen desserts. Always choose good-quality dark chocolate with a cocoa content of around 60–70% for the richest flavor. Use fresh heavy cream and whole milk to achieve the smooth, creamy texture that makes this recipe so satisfying. Measure each ingredient carefully to maintain the correct balance between sweetness, richness, and consistency. Stir the custard continuously while cooking to prevent it from sticking to the bottom of the saucepan or forming lumps. Never skip the step of straining the custard, as it guarantees an exceptionally silky finish. Chilling the mixture thoroughly before churning not only improves texture but also allows the chocolate flavor to develop more fully. Optional mix-ins such as chocolate chips, brownie pieces, cookie crumbs, caramel swirls, or chopped nuts should be added near the end of churning so they remain evenly distributed throughout the ice cream. These simple techniques help produce a homemade dessert that rivals premium ice cream shops.
Nutritional Overview
Homemade chocolate ice cream offers a delicious balance of richness and indulgence. Each serving provides energy from carbohydrates, healthy fats from dairy ingredients, and a modest amount of protein supplied by the milk and egg yolks. Dark chocolate and cocoa powder also contribute small amounts of antioxidants and dietary fiber, adding nutritional value alongside their deep chocolate flavor. Because this dessert is made from simple ingredients without artificial preservatives, it offers a fresher alternative to many commercially produced ice creams. The nutritional values can vary depending on the brand of chocolate, dairy products, and any optional mix-ins used, but each serving remains a satisfying treat that can be enjoyed as part of a balanced diet. Serving moderate portions alongside fresh fruit is an excellent way to enjoy this homemade dessert while adding natural sweetness and extra nutrients.
Description
Enjoy the rich taste of homemade creamy chocolate ice cream made with simple pantry ingredients and fresh dairy. This classic frozen dessert features a smooth custard base, deep chocolate flavor, and a velvety texture that melts beautifully in every bite. Perfect for summer days, birthday celebrations, family gatherings, or whenever you want a delicious homemade treat, this recipe can be prepared with or without an ice cream maker.
Preparation & Cooking Duration
Preparation Time: 20 minutes
Chilling Time: 4–6 hours
Freezing Time: 6–8 hours
Total Time: Approximately 10–14 hours
Servings
Serves
6–8 people
Ingredients
- Ice Cream Base
- 2 cups heavy cream
- 1 cup whole milk
- ¾ cup granulated sugar
- ½ cup unsweetened cocoa powder
- 150 grams dark chocolate, chopped
- 4 egg yolks
- 1 teaspoon vanilla extract
- ¼ teaspoon salt
- Optional Mix-Ins
- Chocolate chips
- Crushed cookies
- Brownie chunks
- Caramel swirls
- Chopped nuts
- Equipment
- Mixing bowls
- Whisk
- Saucepan
- Fine mesh strainer
- Ice cream maker (optional)
- Freezer-safe container
- Rubber spatula
Step-by-Step Instructions
- Prepare the Chocolate Base
Place a saucepan over medium heat. Add the whole milk, heavy cream, and unsweetened cocoa powder. Whisk continuously until the cocoa powder has completely dissolved. Add the chopped dark chocolate and stir until fully melted, creating a smooth and glossy chocolate mixture.
- Whisk the Egg Mixture
In a separate mixing bowl, combine the egg yolks and granulated sugar. Whisk until the mixture becomes pale in color and slightly thickened.
- Temper the Eggs
Slowly pour about one cup of the warm chocolate mixture into the egg mixture while whisking continuously. Gradually add more of the warm mixture until fully combined. Return everything to the saucepan.
- Cook the Custard
Place the saucepan over low heat and stir constantly with a wooden spoon or rubber spatula. Continue cooking until the custard lightly coats the back of a spoon. Do not allow the mixture to boil. The ideal temperature is approximately 170–175°F (77–80°C).
- Add the Flavorings
Remove the saucepan from the heat. Stir in the vanilla extract and salt until evenly combined.
- Strain the Custard
Pour the mixture through a fine mesh strainer into a clean bowl to remove any small lumps and create an extra-smooth ice cream base.
- Chill Thoroughly
Cover the surface of the custard with plastic wrap and refrigerate for at least 4–6 hours or overnight until completely chilled.
- Churn the Ice Cream
Pour the chilled mixture into an ice cream maker and churn according to the manufacturer’s instructions, usually for 20–30 minutes, until it reaches a soft-serve consistency.
- Add Optional Mix-Ins
During the final few minutes of churning, gently fold in chocolate chips, crushed cookies, brownie chunks, caramel swirls, or chopped nuts if desired.
- Freeze Until Firm
Transfer the churned ice cream to a freezer-safe container. Smooth the top with a spatula, cover tightly, and freeze for 6–8 hours until firm enough to scoop.
No Ice Cream Maker Method
Pour the chilled custard into a freezer-safe container and freeze for one hour. Remove the container and stir the mixture vigorously. Repeat this process every 30–45 minutes for approximately 4–5 hours to break up ice crystals and improve the texture. Continue freezing until the ice cream becomes firm.
Notes
Use high-quality dark chocolate containing approximately 60–70% cocoa for the richest flavor.
Always chill the custard completely before freezing to achieve a smoother texture.
Cook the custard gently over low heat to prevent the eggs from curdling.
Straining the mixture creates a silkier finished ice cream.
Store the ice cream in an airtight container with plastic wrap pressed directly onto the surface to reduce ice crystal formation.
For the best flavor and texture, enjoy within two weeks of freezing.
Nutritional Information (Approximate Per Serving)
Calories: 320
Carbohydrates: 28g
Protein: 5g
Fat: 22g
Saturated Fat: 13g
Sugar: 24g
Fiber: 2g


