Chocolate Chip Cloud Cakes are the perfect combination of soft cake, airy whipped frosting, and rich chocolate flavor. Every bite offers a wonderful balance of light texture and sweet indulgence, making this dessert suitable for almost any occasion. Unlike traditional frosted cakes that can feel heavy, these individually sized treats have a delicate crumb topped with a cloud-like layer of whipped cream frosting that melts in your mouth. Finished with chocolate chips and a drizzle of chocolate syrup, they look elegant enough for celebrations while remaining easy enough for everyday baking. Whether you are preparing desserts for a birthday party, afternoon tea, family gathering, or weekend baking project, these homemade cloud cakes are guaranteed to impress. They use simple pantry ingredients that many home bakers already have available, making them an accessible recipe for beginners as well as experienced bakers. Their attractive appearance, soft texture, and irresistible chocolate topping make them a dessert that both children and adults enjoy sharing.
Why Chocolate Chip Cloud Cakes Have Become a Favorite Homemade Dessert
Easy homemade desserts continue to grow in popularity because they allow families to enjoy bakery-quality treats without complicated techniques or expensive ingredients. Chocolate Chip Cloud Cakes perfectly match this trend by combining a simple vanilla cake base with fluffy whipped frosting and classic chocolate toppings. The recipe does not require advanced decorating skills, making it ideal for home bakers of every experience level. Each cake is individually portioned, making serving convenient for parties, holiday celebrations, school events, and family dinners. The soft cake absorbs just enough moisture from the frosting to create an incredibly tender bite while maintaining its shape. Chocolate chips add small bursts of sweetness and texture, while the chocolate syrup provides a glossy finish that makes each cake look professionally decorated. Because the recipe can easily be customized with different toppings, sauces, or seasonal fruits, these cloud cakes remain versatile enough to suit birthdays, baby showers, afternoon gatherings, and festive celebrations throughout the year.
What Makes Cloud Cakes Different from Traditional Cupcakes
Although Chocolate Chip Cloud Cakes may look similar to cupcakes or small frosted cakes, they have several characteristics that make them unique. Instead of using dense buttercream frosting, this recipe features a light whipped cream topping that creates the signature cloud-like appearance. The frosting is piped or spread generously with soft swirls and peaks, giving every cake a delicate and elegant finish. The cake itself is baked as a small round portion with a tender, fluffy crumb that remains moist without becoming heavy. This combination creates a dessert that feels light and refreshing rather than overly rich. Unlike many bakery cakes covered with thick layers of frosting, these cloud cakes focus on balance, allowing the vanilla cake, airy topping, chocolate chips, and chocolate syrup to complement one another beautifully. Their attractive presentation also makes them ideal for dessert tables because each serving already comes perfectly portioned and ready to enjoy without additional slicing or serving utensils.
Simple Ingredients That Create Bakery-Style Results
One of the biggest advantages of this Chocolate Chip Cloud Cakes recipe is that it uses everyday ingredients to create a dessert that looks and tastes professionally made. All-purpose flour provides the foundation for a soft and stable cake, while baking powder and baking soda work together to create a light, fluffy texture. A small amount of salt balances the sweetness and enhances the overall flavor. Softened unsalted butter and granulated sugar are creamed together to introduce air into the batter, producing a delicate crumb after baking. Eggs provide structure and richness, while vanilla extract adds warm, classic flavor that pairs beautifully with chocolate. Milk keeps the batter smooth and moist, ensuring every bite remains tender. The cloud frosting is made from heavy whipping cream, powdered sugar, and vanilla extract, creating a silky topping that is light yet stable enough for decorating. Finally, chocolate chips and chocolate syrup complete the dessert with rich chocolate flavor, while optional caramel drizzle or mini marshmallows allow additional customization without changing the original recipe.
Why Each Ingredient Plays an Important Role
Understanding the purpose of every ingredient helps achieve consistent baking results. Flour forms the structure of the cakes, while baking powder and baking soda release tiny air bubbles during baking, helping the cakes rise evenly. Butter contributes rich flavor while creating a tender crumb, especially when properly creamed with sugar. Granulated sugar not only sweetens the batter but also assists in developing a soft texture by retaining moisture during baking. Eggs bind the ingredients together while adding stability and richness. Vanilla extract enhances the overall flavor profile without overpowering the chocolate toppings. Milk loosens the batter, making it easier to mix while contributing additional moisture. Heavy whipping cream transforms into a light, airy frosting when whipped correctly, providing the signature cloud effect that gives this dessert its name. Powdered sugar sweetens the frosting while helping it remain stable, and chocolate chips introduce bursts of rich chocolate throughout every bite. The finishing drizzle of chocolate syrup adds visual appeal and another layer of chocolate flavor that ties the entire dessert together beautifully.
Equipment You’ll Need Before You Start Baking
Preparing your equipment before mixing the batter makes the baking process more enjoyable and organized. Gather two mixing bowls so the dry and wet ingredients can be prepared separately before combining them. An electric hand mixer or stand mixer makes creaming the butter and sugar much easier while also producing a lighter cake texture. Measuring cups and measuring spoons ensure accurate ingredient portions, which are especially important in baking. A baking tray lined with parchment paper prevents sticking and allows the cakes to lift away easily after baking. A cooling rack helps the cakes cool evenly from all sides, preventing excess moisture from collecting underneath. A silicone spatula is useful for gently folding ingredients together and scraping every bit of batter from the bowl. If you want a professional bakery appearance, prepare a piping bag for decorating the cakes with attractive swirls of whipped frosting. Although the piping bag is optional, it adds a beautiful finishing touch that enhances the overall presentation. Having every tool ready before beginning allows the entire baking process to flow smoothly while producing consistent, impressive results every time.
A successful batch of Chocolate Chip Cloud Cakes begins with properly preparing the oven. Preheat the oven to 350°F (175°C) before mixing the batter so the temperature is stable when the cakes are ready to bake. Consistent heat helps the baking powder and baking soda activate correctly, allowing the cakes to rise evenly while developing a soft and fluffy texture. Line a baking tray with parchment paper to prevent sticking and make cleanup much easier after baking. If using multiple trays, leave enough space between them in the oven so the hot air can circulate freely. Preparing the baking equipment before mixing the ingredients keeps the process organized and prevents the batter from sitting too long before baking. Since the batter contains leavening agents that begin working once combined with the wet ingredients, placing it into a fully heated oven helps produce the best volume and texture. This simple preparation step lays the foundation for beautifully baked cakes with a tender crumb and lightly golden surface.
Mixing the Dry Ingredients Correctly
The dry ingredients form the structural base of these light and fluffy cakes, so mixing them thoroughly is essential. In a medium-sized mixing bowl, combine the all-purpose flour, baking powder, baking soda, and salt. Whisk the ingredients together until everything is evenly blended. This step distributes the leavening agents throughout the flour, helping every cake rise uniformly during baking. Skipping this process may result in uneven texture or pockets of baking powder that affect the flavor. Properly blended dry ingredients also reduce the risk of overmixing later because the flour incorporates more easily into the wet ingredients. Although this stage takes only a minute or two, it contributes significantly to creating cakes with a consistent crumb and balanced texture. Once combined, set the bowl aside while preparing the butter mixture. Organizing the ingredients this way helps the baking process move smoothly and ensures every component is ready when needed.
Creaming the Butter and Sugar for a Light Texture
Creaming the butter and sugar is one of the most important techniques in this recipe because it introduces tiny air pockets that help create soft, fluffy cakes. Place the softened unsalted butter and granulated sugar into a large mixing bowl and beat them together using an electric mixer for approximately three to four minutes. As the mixture is beaten, it gradually becomes lighter in both color and texture, turning pale, smooth, and creamy. This process should not be rushed because the trapped air contributes to the cake’s tender crumb during baking. Softened butter blends much more easily than cold butter, creating a smoother mixture with better volume. Proper creaming also allows the sugar to dissolve more evenly, resulting in a finer texture throughout the finished cakes. Taking a few extra minutes during this step makes a noticeable difference in the softness of the final dessert and helps achieve the light consistency that gives these cloud cakes their name.
Adding the Eggs and Vanilla
Once the butter and sugar have been thoroughly creamed, begin adding the eggs one at a time. Mix well after each addition before adding the next egg to maintain a smooth and stable batter. Incorporating the eggs gradually helps prevent the mixture from separating while creating a rich, silky consistency. After both eggs have been fully blended, add the vanilla extract and continue mixing until everything is evenly combined. Vanilla adds warmth and depth of flavor that complements both the whipped frosting and chocolate toppings without overpowering them. The batter should appear creamy, smooth, and free of lumps before moving to the next step. Using room-temperature eggs helps them blend more easily with the butter mixture, producing a more uniform batter. Careful mixing during this stage contributes to a finer crumb and improves the overall structure of the cakes once baked.
Combining the Wet and Dry Ingredients
To achieve soft and tender cakes, gradually add the prepared flour mixture to the butter mixture while alternating with the milk. Begin by adding a portion of the dry ingredients, followed by a small amount of milk, repeating the process until everything has been incorporated. Mixing in stages helps create a smooth batter without overworking the flour. Continue mixing only until no dry streaks remain. Overmixing can develop too much gluten, resulting in cakes that are dense instead of light and fluffy. The finished batter should be thick, smooth, and easy to scoop without being runny. If mixed correctly, it will spread gently while still holding its shape. This balanced consistency allows the cakes to bake evenly and develop their characteristic soft texture. Gentle mixing at this stage is one of the simplest ways to ensure consistently tender homemade cloud cakes every time.
Shaping and Baking the Cakes
Using a spoon or cookie scoop, divide the batter into even portions on the prepared baking tray. Shape each portion into a round cake approximately four inches wide, leaving enough space between them to allow for gentle spreading during baking. Uniform sizing helps all the cakes bake evenly and finish at the same time. Place the tray into the preheated oven and bake for 12 to 15 minutes. As the cakes bake, the tops should become lightly golden while remaining soft to the touch. To check for doneness, insert a toothpick into the center of one cake. If it comes out clean or with only a few dry crumbs attached, the cakes are ready. Avoid baking them for too long, as overbaking can reduce their moisture and softness. Once baked, remove the tray from the oven and allow the cakes to cool for about five minutes before transferring them to a wire rack. Cooling completely is essential because warm cakes can melt the whipped frosting during decorating.
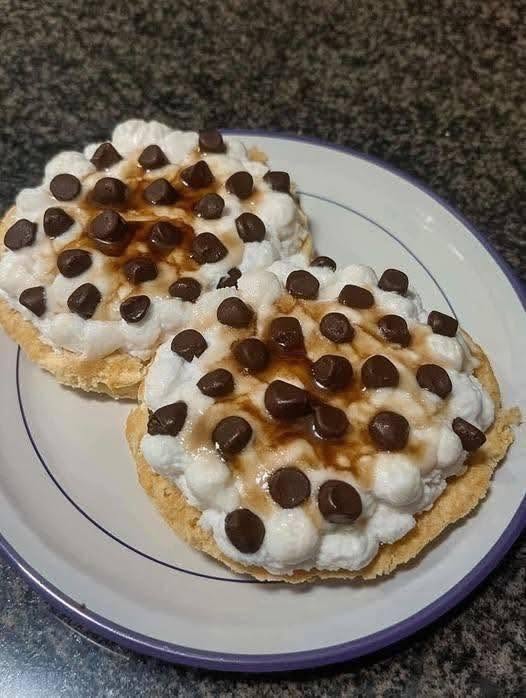
Preparing the Cloud Frosting and Decorating
After the cakes have cooled completely, prepare the signature cloud frosting. Pour the heavy whipping cream into a chilled mixing bowl, then add the powdered sugar and vanilla extract. Beat the mixture until stiff peaks form, creating a light, airy frosting that holds its shape while remaining smooth and creamy. Avoid overwhipping, as this can cause the cream to become grainy. Spread or pipe a generous amount of frosting onto each cake, creating soft swirls and peaks that resemble fluffy clouds. The textured appearance is part of what makes these cakes so visually appealing. Sprinkle the chocolate chips generously over the frosting, pressing them lightly so they stay in place. Finally, drizzle chocolate syrup over each cake using zigzag lines, circles, or free-form patterns for an elegant finish. If desired, complete the decoration with the optional caramel drizzle or mini marshmallows included in the original recipe. The finished Chocolate Chip Cloud Cakes are soft, beautiful, and ready to serve for any special occasion.
Chocolate Chip Cloud Cakes are wonderfully versatile and can be served in many different ways depending on the occasion. Their soft texture and light whipped topping make them an excellent dessert after both casual family meals and elegant dinner parties. For a comforting afternoon treat, enjoy a cake alongside a freshly brewed cup of coffee, cappuccino, or hot tea. If serving children or preparing a dessert table for celebrations, pair the cakes with a glass of cold milk, creamy vanilla milkshake, or fresh strawberry smoothie. During warmer months, these cakes also complement iced coffee or chilled hot chocolate perfectly. Arrange them on a decorative serving platter and garnish with a light drizzle of extra chocolate syrup just before serving for an eye-catching presentation. Since each cake is individually portioned, they are ideal for birthday parties, baby showers, holiday gatherings, afternoon tea events, and weekend family desserts. Their elegant appearance requires very little additional decoration, allowing them to become the centerpiece of any dessert table.
Delicious Flavor Variations to Try
Although the classic Chocolate Chip Cloud Cakes are delicious as written, there are several easy ways to customize the recipe while preserving its soft texture and beautiful presentation. For chocolate lovers, prepare a double chocolate version by adding ¼ cup cocoa powder to the cake batter before baking. This creates a deeper chocolate flavor that pairs beautifully with the whipped frosting and chocolate chips. A cookies and cream variation can be made by sprinkling crushed chocolate sandwich cookies over the frosting before adding the chocolate syrup. For a fruity option, decorate the cakes with fresh sliced strawberries and finish with a drizzle of strawberry sauce for a refreshing contrast. Those who enjoy caramel desserts can replace the chocolate syrup with caramel sauce and sprinkle chopped pecans over the frosting for additional crunch. To create a festive birthday version, decorate each cake with colorful sprinkles and mini chocolate candies. These simple variations allow the recipe to suit different tastes while maintaining the same light and fluffy character that makes these cloud cakes so enjoyable.
Proper Storage for Maximum Freshness
Proper storage helps preserve the soft texture and fresh flavor of Chocolate Chip Cloud Cakes. Once decorated, place the cakes in an airtight container and store them in the refrigerator. They will remain fresh for up to three days while maintaining the stability of the whipped frosting. To prevent the frosting from becoming damaged, avoid stacking the cakes directly on top of one another. If you plan to prepare the dessert ahead of time, consider storing the cake bases separately and decorating them shortly before serving. This helps preserve the airy texture of the whipped cream while keeping the cakes looking freshly made. When serving refrigerated cakes, allow them to sit at room temperature for approximately ten to fifteen minutes before enjoying. This slight warming enhances the flavor of the butter in the cake and softens the frosting, creating a more enjoyable eating experience. Proper storage ensures every cake remains moist, attractive, and delicious from the first serving to the last.
Freezing Instructions for Make-Ahead Baking
Chocolate Chip Cloud Cakes are also an excellent dessert for advance preparation. The cake bases freeze very well and can be stored without affecting their texture when properly wrapped. Allow the baked cakes to cool completely before wrapping each one individually in plastic wrap. Place the wrapped cakes inside a freezer-safe container or resealable freezer bag to protect them from freezer burn. They can be frozen for up to two months. When ready to serve, remove the cakes from the freezer and allow them to thaw completely at room temperature. Prepare the fresh whipped frosting only after the cakes have thawed, then decorate with chocolate chips and chocolate syrup just before serving. Freezing only the cake bases helps preserve the light texture of the whipped topping while making party preparation much easier. This convenient method allows you to complete most of the baking well in advance, leaving only the enjoyable decorating process for the day of serving.
Notes
Use Room-Temperature Ingredients
Softened butter, room-temperature eggs, and milk combine more smoothly than cold ingredients. This creates a silky batter that bakes into soft, tender cakes with a fine crumb.
Chill the Mixing Bowl for the Frosting
A cold mixing bowl and chilled beaters help heavy whipping cream whip more quickly and achieve greater volume. This produces the fluffy cloud-like frosting that gives the dessert its signature appearance.
Avoid Overmixing the Batter
Mix the ingredients only until everything is combined. Overmixing develops too much gluten in the flour, which can produce dense cakes instead of the light, airy texture you want.
Do Not Overbake
Watch the cakes closely during the final few minutes of baking. Removing them as soon as a toothpick comes out clean helps keep the crumb moist and tender.
Choose Good-Quality Chocolate Chips
Higher-quality chocolate chips provide a smoother flavor and richer chocolate taste, making the finished dessert even more enjoyable.
Can Store-Bought Whipped Topping Be Used?
Yes. Store-bought whipped topping can be used as a convenient alternative to homemade whipped cream if you are short on time.
Can the Cakes Be Made Ahead of Time?
Yes. Bake the cake bases one day in advance and keep them covered. Add the frosting and toppings shortly before serving for the freshest presentation.
Can Dark Chocolate Chips Be Used?
Absolutely. Dark chocolate chips create a richer chocolate flavor and balance the sweetness of the whipped frosting beautifully.
Can This Recipe Be Made Gluten-Free?
Yes. Replace the all-purpose flour with a gluten-free baking flour blend designed for cakes while following the remaining instructions as written.
Chocolate Chip Cloud Cakes with Fluffy Vanilla Frosting
Chocolate Chip Cloud Cakes are soft, fluffy vanilla cakes topped with a light whipped cream frosting, generous chocolate chips, and a rich chocolate syrup drizzle. Perfect for birthdays, afternoon tea, family gatherings, or weekend baking, these elegant mini cakes combine a tender crumb with creamy topping and delicious chocolate flavor.
Preparation & Cooking Duration
- Preparation Time: 25 minutes
- Baking Time: 15 minutes
- Cooling Time: 30 minutes
- Decorating Time: 15 minutes
- Total Time: Approximately 1 hour 25 minutes
Servings
8 servings
Ingredients
For the Cake Bases
- 2 cups all-purpose flour
- 1 teaspoon baking powder
- ½ teaspoon baking soda
- ¼ teaspoon salt
- ½ cup unsalted butter, softened
- ¾ cup granulated sugar
- 2 large eggs
- 1 teaspoon vanilla extract
- ¾ cup milk
For the Cloud Frosting
- 2 cups heavy whipping cream
- ¼ cup powdered sugar
- 1 teaspoon vanilla extract
For the Toppings
- 1 cup chocolate chips
- ¼ cup chocolate syrup
- Optional caramel drizzle
- Optional mini marshmallows
Step-by-Step Instructions
- Preheat the oven to 350°F (175°C) and line a baking tray with parchment paper.
- Whisk together the flour, baking powder, baking soda, and salt in a medium bowl.
- Beat the softened butter and granulated sugar until pale and fluffy.
- Add the eggs one at a time, mixing well after each addition, then stir in the vanilla extract.
- Gradually add the dry ingredients, alternating with the milk, and mix until a smooth batter forms.
- Scoop even portions of batter onto the prepared baking tray, shaping each into a round cake about 4 inches wide.
- Bake for 12–15 minutes or until lightly golden and a toothpick inserted into the center comes out clean.
- Cool on the baking tray for 5 minutes, then transfer to a wire rack and cool completely.
- Beat the heavy whipping cream, powdered sugar, and vanilla extract until stiff peaks form.
- Spread or pipe the whipped frosting generously onto each cooled cake.
- Sprinkle chocolate chips over the frosting.
- Finish with a drizzle of chocolate syrup and optional caramel drizzle or mini marshmallows.
- Serve immediately or refrigerate until ready to enjoy.
Nutritional Information (Approximate Per Serving)
- Calories: 340
- Protein: 5 g
- Carbohydrates: 35 g
- Fat: 20 g
- Saturated Fat: 12 g
- Sugar: 22 g
- Fiber: 1 g


