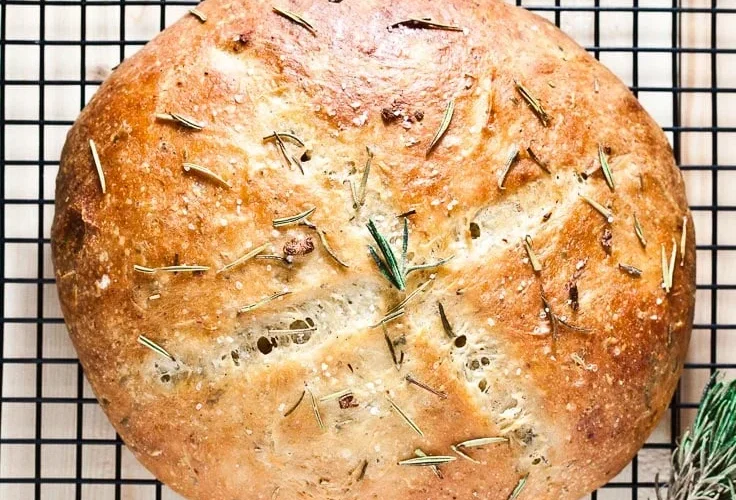
Rustic No-Knead Rosemary Garlic Sourdough Bread is a flavorful homemade loaf with a crisp golden crust, a soft chewy center, and the wonderful combination of fresh rosemary and garlic. It is an excellent recipe for anyone who loves artisan-style sourdough but does not want to spend a lot of time kneading dough by hand. Instead of traditional kneading, the dough develops strength through resting, gentle stretch-and-folds, and a long fermentation.
The long fermentation gives this bread its characteristic sourdough flavor while allowing the rosemary and garlic to become beautifully blended throughout the loaf. The result is a rustic boule that looks impressive but uses a straightforward process. You simply mix the ingredients, allow the dough to rest, complete a few gentle folds, let fermentation do its work, shape the loaf, and finish with an overnight cold proof.
Why You Will Love This Rosemary Garlic Sourdough Bread
This sourdough bread is especially appealing because it combines an artisan appearance with a relatively simple preparation method. There is no intensive kneading required, and most of the process involves waiting while the dough develops flavor and structure naturally. The finished loaf has a beautifully crisp crust and a tender, chewy crumb that makes it perfect for everyday meals or special occasions.
Fresh rosemary adds an earthy herbal aroma, while minced garlic gives the loaf a savory flavor that becomes even more noticeable when the bread is toasted. The combination works particularly well with soups, roasted vegetables, eggs, grilled chicken, cheese, butter, and simple olive oil.
Recipe Overview
This recipe makes one large rustic loaf. The active preparation takes about 20 minutes, while the dough needs several hours for fermentation and an overnight cold proof. The original recipe lists approximately 10 to 16 hours for resting and fermentation, with a baking time of 45 to 50 minutes.
The recipe uses an active sourdough starter, bread flour, warm water, sea salt, fresh rosemary, fresh garlic, olive oil, and a small amount of optional honey or maple syrup. These ingredients create a simple but flavorful dough without the need for complicated additions.
Ingredients
- 100 g active sourdough starter
- 350 g warm water
- 500 g bread flour
- 10 g fine sea salt
- 2 tablespoons fresh rosemary, finely chopped
- 4–5 garlic cloves, finely minced
- 1 tablespoon olive oil
- 1 teaspoon honey or maple syrup, optional
- Extra flour, for shaping
- A little olive oil or parchment paper for baking
How to Make Rustic Rosemary Garlic Sourdough Bread
1. Mix the Dough
Begin by adding the active sourdough starter and warm water to a large mixing bowl. Stir the mixture until the starter is mostly dissolved and the water looks cloudy.
Add the bread flour, fine sea salt, finely chopped rosemary, minced garlic, olive oil, and optional honey or maple syrup. Mix everything together with a wooden spoon or your hands until there are no obvious dry patches of flour remaining.
The dough should look rough and sticky at this stage. That is completely normal. This is a no-knead-style sourdough, so there is no need to spend time working the dough until it becomes smooth. The fermentation and gentle folds later in the process will help develop the dough’s structure.
2. Let the Dough Rest
Cover the bowl with a clean kitchen towel or plastic wrap and allow the dough to rest at room temperature for about 30 minutes.
This short resting period gives the flour time to absorb the water and allows the dough to begin developing naturally. After resting, the dough should feel more hydrated and easier to handle.
3. Perform Gentle Stretch-and-Folds
After the first 30-minute rest, wet your hands to prevent the dough from sticking. Grab one side of the dough and gently stretch it upward before folding it over the center.
Turn the bowl and repeat the movement three or four times. Try to be gentle rather than forceful. The purpose is to gradually strengthen the dough without aggressively kneading it.
Cover the bowl and let the dough rest for another 30 minutes. Repeat the stretch-and-fold process two or three more times, approximately every 30 minutes. As you continue, you should notice that the dough becomes smoother, stronger, and more elastic.
4. Bulk Fermentation
Once the stretch-and-folds are complete, cover the bowl again and allow the dough to ferment at room temperature.
The dough should become noticeably puffy and increase in size by approximately 50–75%. Depending on the temperature of your kitchen and the strength of your sourdough starter, this can take around 4–8 hours.
Instead of depending entirely on the clock, look at the dough itself. Bubbles around the sides, an airy appearance, and a slightly jiggly texture are useful signs that fermentation is progressing well.
5. Shape the Loaf
Lightly flour your work surface and gently turn the fermented dough out onto it. Try not to press the dough aggressively because you want to retain the air that has developed during fermentation.
Shape the dough into a round boule by folding the edges toward the center. Then gently pull the dough toward yourself to create surface tension.
Place the shaped loaf seam-side up in a well-floured banneton. If you do not have a banneton, you can use a bowl lined with a heavily floured kitchen towel.
6. Cold Proof Overnight
Cover the shaped dough and place it in the refrigerator for 8–12 hours, preferably overnight.
This slow cold fermentation is an important part of the recipe because it helps develop the flavor and texture of the finished loaf. The chilled dough will also be easier to handle when it is time to score and transfer it to the Dutch oven.
7. Preheat the Dutch Oven
Place a Dutch oven with its lid inside your oven. Preheat the oven to 450°F (230°C) for at least 30–45 minutes.
A thoroughly heated Dutch oven helps create the strong oven spring and crisp crust associated with artisan-style sourdough bread. Make sure the Dutch oven is fully preheated before you bake the loaf.
8. Score the Bread
When you are ready to bake, carefully turn the cold dough onto a piece of parchment paper. Lightly dust the surface with flour if desired.
Using a sharp bread lame or razor blade, make one deep slash across the top of the loaf. You can also add a few smaller decorative cuts if you want to give your bread a more rustic bakery-style appearance.
Scoring gives the expanding dough a controlled place to open during baking.
9. Bake
Carefully lower the prepared dough into the hot Dutch oven. Cover it with the lid and bake for 25 minutes.
After 25 minutes, remove the lid and reduce the oven temperature to 425°F (220°C). Continue baking for another 18–25 minutes, or until the crust is deeply golden brown.
If you prefer a darker and extra-crispy crust, you can allow the loaf to bake for a few additional minutes while keeping a close eye on it.
10. Cool Completely
Transfer the finished loaf to a wire rack and let it cool for at least one hour before slicing.
Although it can be tempting to cut into a freshly baked loaf immediately, allowing it to cool gives the interior time to finish setting. Cutting too early can affect the crumb and may leave it with a gummy texture.
Tips for the Best Rosemary Garlic Sourdough
Use an Active Sourdough Starter
For the best fermentation, use a starter that is bubbly, active, and capable of rising well after feeding. The strength of your starter can have a major effect on fermentation time, so watch the dough rather than relying only on a specific number of hours.
Keep the Garlic Amount Balanced
Fresh garlic adds wonderful savory flavor, but using too much can change the dough because garlic contains moisture. Staying close to the recommended 4–5 cloves helps maintain the balance between the garlic flavor and the sourdough itself.
Add More Rosemary for Extra Flavor
If you love rosemary, you can increase the herb slightly. The original recipe notes that another teaspoon or two of finely chopped fresh rosemary can be used for a stronger rosemary flavor.
Try Roasted Garlic
For a softer and sweeter garlic flavor, roasted garlic is another option. Roast the garlic until soft and golden, allow it to cool completely, and then gently incorporate it into the dough. This creates a milder garlic character compared with fresh minced garlic.
Watch the Dough Instead of the Clock
Sourdough fermentation can vary considerably depending on room temperature and starter activity. A warm kitchen may speed up fermentation, while a cooler environment may slow it down. Look for the visual and textural signs of fermentation instead of following the clock blindly.
Do Not Skip the Dutch Oven Preheat
A properly preheated Dutch oven provides the intense heat needed to encourage good oven spring and create a crisp, deeply browned crust. Give the oven and Dutch oven enough time to become thoroughly hot before adding the dough.
How to Serve Rosemary Garlic Sourdough Bread
This rustic sourdough loaf is incredibly versatile. Slice it thick and serve it with salted butter for a simple snack, or pair it with olive oil and balsamic vinegar for an easy appetizer.
It also works beautifully alongside soups and stews because the chewy crumb is perfect for soaking up flavorful broth. For breakfast or brunch, serve toasted slices with scrambled or fried eggs.
For lunch or dinner, the bread pairs well with grilled chicken, roasted vegetables, cheese, and charcuterie. Toasting the slices with a little butter is another simple way to bring out the aroma of the rosemary and garlic.
How to Store the Bread
Once the loaf has completely cooled, keep it at room temperature in a paper bag or wrap it loosely in a clean kitchen towel. The bread can be stored this way for approximately 2–3 days.
For longer storage, slice the bread and place the slices in an airtight freezer bag. The bread can be frozen for up to 3 months. Individual slices can then be toasted directly from frozen whenever you want a quick serving of homemade sourdough.
Final Thoughts
Rustic No-Knead Rosemary Garlic Sourdough Bread is a wonderful recipe for anyone who wants homemade artisan bread without the effort of traditional kneading. The combination of long fermentation, fresh rosemary, and garlic creates a loaf with plenty of character, while the Dutch oven helps produce the crisp, golden crust that makes sourdough so satisfying.
The process is mostly about mixing, resting, gently folding, fermenting, shaping, and waiting. Once you become familiar with how your dough behaves, this flavorful rosemary garlic sourdough can become a dependable homemade favorite for breakfast, lunch, dinner, or serving alongside your favorite soup or stew.
Recipe Card
Rustic No-Knead Rosemary Garlic Sourdough Bread
Description: A rustic homemade sourdough loaf flavored with fresh rosemary and garlic, featuring a crisp golden crust and soft, chewy interior.
Prep Time: 20 minutes
Rest/Fermentation: 10–16 hours
Bake Time: 45–50 minutes
Total Time: About 12–17 hours
Yield: 1 large loaf
Difficulty: Easy
Ingredients
- 100 g active sourdough starter
- 350 g warm water
- 500 g bread flour
- 10 g fine sea salt
- 2 tablespoons fresh rosemary, finely chopped
- 4–5 garlic cloves, finely minced
- 1 tablespoon olive oil
- 1 teaspoon honey or maple syrup, optional
- Extra flour, for shaping
- A little olive oil or parchment paper for baking
Instructions
- Mix the active sourdough starter with warm water.
- Add bread flour, salt, rosemary, garlic, olive oil, and optional honey or maple syrup.
- Mix until a rough, sticky dough forms. Do not knead.
- Cover and rest for 30 minutes.
- Perform gentle stretch-and-folds, resting for 30 minutes between rounds.
- Continue bulk fermentation until the dough is puffy and has increased by approximately 50–75%.
- Shape the dough into a round boule and place it seam-side up in a floured banneton or lined bowl.
- Cover and refrigerate for 8–12 hours.
- Preheat a Dutch oven at 450°F (230°C) for 30–45 minutes.
- Transfer the cold dough to parchment paper and score the top.
- Bake covered at 450°F (230°C) for 25 minutes.
- Remove the lid, reduce the temperature to 425°F (220°C), and bake for another 18–25 minutes.
- Cool on a wire rack for at least 1 hour before slicing.
Nutritional Information
Nutritional values will vary depending on the exact ingredients, serving size, and amount of sourdough starter used. For the most accurate information, calculate nutrition using the specific brands and quantities used when preparing the recipe.
Serving Suggestion: Enjoy thick slices with butter, olive oil and balsamic vinegar, eggs, soup, grilled chicken, roasted vegetables, or cheese.


