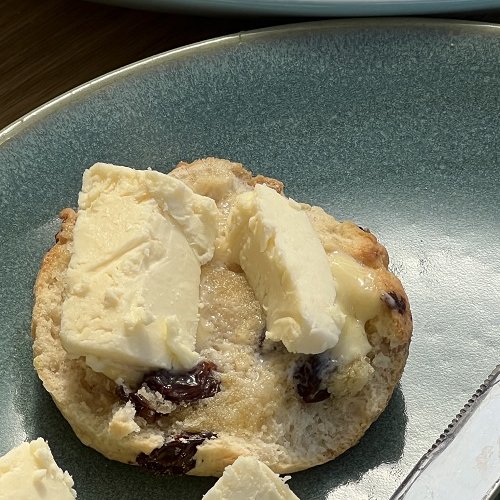
Gluten-Free Fruit Scones are a delicious homemade treat with a lightly golden exterior, a tender center, and sweet pieces of dried fruit in every bite. They are perfect for afternoon tea, weekend breakfasts, brunch gatherings, or whenever you want a simple baked treat to enjoy with your favorite hot drink. Made with gluten-free flour, butter, milk, and dried fruit, these scones offer a classic bakery-style experience without traditional wheat flour.
One of the best things about this recipe is that it uses straightforward ingredients and a simple mixing method. There is no yeast, no lengthy rising time, and no complicated baking technique. You simply combine the dry ingredients, rub in the butter, add the milk and fruit, shape the dough, and bake until the scones are lightly golden.
The dried fruit adds natural sweetness and a pleasant chewy texture, while the butter helps create a rich flavor. A little milk brings the dough together, and baking powder gives the scones a light rise. The result is a comforting treat that tastes wonderful served slightly warm with butter, jam, or cream.
Whether you follow a gluten-free diet or are baking for someone who avoids gluten, these Gluten-Free Fruit Scones are a lovely addition to your recipe collection.
Why You Will Love These Gluten-Free Fruit Scones
Gluten-Free Baking: This recipe uses a gluten-free flour blend instead of regular wheat flour, making it suitable for a gluten-free menu when all ingredients are verified gluten-free.
Sweet Fruit in Every Bite: Raisins or sultanas add sweetness and chewy texture without requiring a large amount of additional sugar.
Simple Ingredients: You can prepare these scones with common baking ingredients available in most supermarkets.
Easy to Make: The dough comes together quickly, making this recipe suitable for beginner bakers.
Perfect for Afternoon Tea: Serve the scones with tea, coffee, jam, or cream for a traditional-style treat.
Freezer-Friendly: Bake a batch ahead of time and freeze the cooled scones for convenient snacks later.
Ingredients for Gluten-Free Fruit Scones
The following ingredients make approximately 8 medium-sized scones.
Dry Ingredients
- 2 cups gluten-free plain flour blend
- 2 teaspoons gluten-free baking powder
- 3 tablespoons granulated sugar
- ¼ teaspoon salt
Wet Ingredients
- 4 tablespoons cold unsalted butter, cut into small cubes
- ¾ cup milk, plus a little extra if needed
- 1 large egg, beaten
Fruit
- ½ cup raisins or sultanas
- ½ teaspoon vanilla extract, optional
For the Tops
- 1 tablespoon milk or beaten egg, for brushing
- A little extra granulated sugar, optional
Ingredient note: Use a gluten-free flour blend designed for baking. Some blends contain xanthan gum, which can help provide structure. If your blend does not contain a binder, the texture may be more fragile, so follow the flour manufacturer’s guidance.
How to Make Gluten-Free Fruit Scones
Step 1: Preheat the Oven
Preheat your oven to 400°F (200°C), or 180°C for a fan-assisted oven. Line a baking tray with parchment paper.
Preparing the tray before mixing helps you transfer the shaped scones quickly. A properly heated oven encourages the scones to rise and develop a lightly golden exterior.
Measure the ingredients before you begin, and make sure the butter is cold. Cold butter helps create a tender texture and prevents the dough from becoming greasy during mixing.
Step 2: Combine the Dry Ingredients
Place the gluten-free flour, baking powder, sugar, and salt in a large mixing bowl. Stir until everything is evenly distributed.
Mixing the dry ingredients thoroughly helps the baking powder work evenly throughout the dough. This is particularly important when using gluten-free flour, because the texture can become dense if the ingredients are not properly combined.
If your flour blend contains xanthan gum or another binder, check the package instructions before adding any extra.
Step 3: Rub in the Cold Butter
Add the cold butter cubes to the flour mixture. Using your fingertips, rub the butter into the flour until the mixture resembles fine breadcrumbs, with a few small pieces of butter remaining.
Work quickly to keep the butter cool. Avoid squeezing the mixture into a solid mass.
This technique helps create a tender crumb when the scones bake. Small pieces of butter can melt in the oven and contribute to a softer texture.
Step 4: Add the Dried Fruit
Stir the raisins or sultanas into the flour and butter mixture. Separate any fruit pieces that are stuck together so they distribute evenly.
If the dried fruit is very hard, you can soak it briefly in warm water, then drain and pat it completely dry before adding it to the dough. This helps soften the fruit without adding too much moisture.
You can also use a mixture of raisins and sultanas for a more varied flavor.
Step 5: Mix the Wet Ingredients
In a separate bowl, combine the milk, beaten egg, and vanilla extract if using.
Make a well in the center of the dry ingredients and gradually pour in most of the liquid mixture. Keep a small amount aside in case the dough needs additional moisture.
Stir gently with a spoon or spatula until the ingredients begin to form a soft dough. Gluten-free flour blends absorb liquid differently, so you may not need every drop of the milk mixture.
Step 6: Bring the Dough Together
Use your hands or a spatula to bring the mixture together gently. The dough should be soft and slightly tacky, but it should still hold its shape.
If it feels too dry or crumbly, add a little extra milk, one teaspoon at a time. If it is excessively sticky, let it rest for a few minutes so the flour can absorb some moisture. Add only a small amount of extra flour if necessary.
Avoid overworking the dough. Gluten-free dough does not need the same kneading process as traditional bread dough, and excessive handling can make the scones dense.
Step 7: Shape the Dough
Lightly dust your work surface with gluten-free flour. Transfer the dough onto the surface and gently pat it into a round disc approximately 1 inch thick.
Do not roll the dough too thin. A thicker disc helps create taller scones with soft centers.
Use a round cookie cutter, approximately 2–2½ inches wide, to cut out the scones. Press the cutter straight down rather than twisting it, which can help the edges rise more evenly.
Gather any leftover dough gently, reshape it, and cut out additional scones. Handle the dough as little as possible.
Step 8: Arrange and Brush the Scones
Place the shaped scones on the prepared baking tray, leaving a little space between each one.
Brush the tops lightly with milk or beaten egg. Milk encourages a gentle golden color, while egg wash usually creates a deeper shine.
If you like a slightly sweeter top, sprinkle a small pinch of granulated sugar over each scone.
Be careful not to let the glaze drip heavily down the sides, as this can affect how the edges bake.
Step 9: Bake Until Golden
Bake for approximately 15–20 minutes, or until the scones have risen and their tops are lightly golden.
The exact baking time depends on the size of the scones, the flour blend, and your oven. Smaller scones may cook faster, while larger ones may need a few extra minutes.
Check the undersides as well. They should be lightly golden, and the centers should no longer look wet or underbaked.
Avoid baking for too long, as gluten-free scones can become dry if too much moisture is lost.
Step 10: Cool and Serve
Remove the tray from the oven and let the scones rest for several minutes before transferring them to a wire rack.
Gluten-free scones can be more delicate while hot, so allowing them to cool slightly helps them hold their shape.
Serve warm or at room temperature with butter, jam, or cream. For the best texture, enjoy them on the day they are baked.
Tips for the Best Gluten-Free Fruit Scones
Choose a Suitable Flour Blend
A gluten-free flour blend formulated for cakes, biscuits, or scones is generally a better choice than a single gluten-free flour. Different blends absorb liquid differently, so adjust the milk gradually.
Keep the Butter Cold
Cold butter helps create a tender texture. If the butter becomes too soft during preparation, chill the mixture briefly before adding the liquid.
Do Not Add All the Milk at Once
Start with most of the liquid and add more only if needed. This prevents the dough from becoming too wet and difficult to shape.
Avoid Overworking the Dough
Handle the dough gently and stop mixing as soon as it comes together. Too much handling can produce heavy scones.
Shape the Dough Thickly
A disc about 1 inch thick helps create a taller result. If the dough is pressed too thin, the scones may turn out flatter.
Use a Sharp Cutter
Press the cutter straight down without twisting. This helps keep the edges neat and may encourage a more even rise.
Measure Carefully
Gluten-free baking is sensitive to changes in moisture and flour quantities. Measuring ingredients accurately helps produce more consistent results.
Variations and Substitutions
Mixed Fruit Scones
Replace some or all of the raisins with sultanas or another dried fruit suitable for baking. Keep the total quantity close to ½ cup so the dough maintains a workable texture.
Orange and Fruit Scones
Add a little finely grated orange zest to the dry ingredients. Orange pairs beautifully with raisins and sultanas and gives the scones a fresh aroma.
Cinnamon Fruit Scones
Add ½ teaspoon of ground cinnamon to the flour mixture for a warmer flavor. This variation is especially enjoyable during cooler weather.
Lemon Fruit Scones
Add finely grated lemon zest and a small amount of vanilla extract. The citrus flavor complements the dried fruit without overpowering the buttery dough.
Dairy-Free Gluten-Free Scones
Replace the butter with a suitable firm dairy-free baking alternative and use an unsweetened plant-based milk. Choose products labeled gluten-free where necessary. The texture may vary depending on the substitutions.
Reduced-Sugar Scones
You can reduce the added sugar slightly because dried fruit already contributes sweetness. Keep in mind that sugar affects flavor, browning, and texture, so large reductions may change the final result.
Fresh Fruit Variation
Fresh fruit adds extra moisture and can make the dough harder to handle. If using fresh fruit, choose small, firm pieces and reduce other liquid slightly if necessary. Dried fruit is generally more reliable for this recipe.
What to Serve with Gluten-Free Fruit Scones
These scones are delicious with a variety of sweet toppings and drinks.
Butter: Spread a little butter over a warm scone for a simple, comforting snack.
Jam: Strawberry, raspberry, or apricot jam adds sweetness and fruity flavor.
Clotted Cream or Whipped Cream: For a more traditional afternoon-tea presentation, serve with cream and a little jam.
Greek Yogurt: Plain Greek yogurt provides a creamy accompaniment and adds protein to the snack.
Tea or Coffee: A cup of black tea, herbal tea, or coffee pairs beautifully with the buttery texture.
Fresh Berries: Serve with strawberries, raspberries, or blueberries for a fresh contrast to the dried fruit.
If you are preparing an afternoon-tea platter, arrange the scones alongside fresh fruit and a selection of spreads.
How to Store Gluten-Free Fruit Scones
At Room Temperature: Allow the scones to cool completely, then place them in an airtight container. They are best enjoyed within 1–2 days, as gluten-free baked goods can dry out more quickly than traditional versions.
In the Refrigerator: Refrigeration is usually unnecessary for plain scones without perishable fillings or toppings. If you add cream or another perishable topping, refrigerate it separately or follow appropriate food-safety guidance.
In the Freezer: Freeze completely cooled scones in a freezer-safe container or bag for up to 2 months for best quality. Separate them with parchment paper if stacking.
Reheating: Warm a scone in an oven preheated to 300°F (150°C) for approximately 5–8 minutes, or until warmed through. You can also use a microwave for a few seconds, although the texture will be softer rather than crisp.
For the best result, freeze the scones soon after cooling and thaw only the amount you plan to eat.
Frequently Asked Questions
Are Gluten-Free Fruit Scones Suitable for People with Coeliac Disease?
They can be suitable when all ingredients are gluten-free and cross-contact is avoided. Use certified or clearly labeled gluten-free flour and baking powder where appropriate, and prepare the recipe with clean equipment and surfaces.
Why Are My Gluten-Free Scones Crumbly?
The dough may be too dry, or the flour blend may lack enough binding ingredients. Add liquid gradually until the dough holds together, and check whether your flour blend already contains xanthan gum or another binder.
Why Did My Scones Not Rise?
Possible causes include old baking powder, dough that was pressed too thin, or a flour blend that behaves differently from the one intended for the recipe. Check the freshness of your baking powder and shape the dough into a thick disc.
Can I Make the Dough Ahead of Time?
For the best rise and texture, shape and bake the scones shortly after mixing. You can measure the dry ingredients and prepare the dried fruit ahead of time. Alternatively, freeze the shaped unbaked scones and bake them from frozen, allowing extra time and checking that the centers are cooked through.
Can I Use Self-Raising Gluten-Free Flour?
Yes, provided it is a gluten-free self-raising blend. Check whether it already contains a raising agent and adjust the additional baking powder accordingly to avoid adding too much.
Can I Make These Scones Without Eggs?
The egg contributes moisture and structure and can also be used for brushing the tops. Omitting it may change the texture. For an egg-free version, use a recipe tested with an appropriate egg substitute and adjust the liquid as needed.
Can I Use Fresh Fruit Instead of Dried Fruit?
You can experiment with small pieces of fresh fruit, but they add more moisture and may make the dough softer. Dried fruit is the more reliable option for maintaining the traditional scone texture.
How Can I Tell When the Scones Are Done?
The scones should have risen, look lightly golden, and feel set on the outside. The bottoms should be lightly colored, and the centers should not appear wet or doughy.
Final Thoughts
Gluten-Free Fruit Scones are a comforting homemade bake with a golden exterior, a soft center, and sweet dried fruit throughout. They are easy to prepare with a gluten-free flour blend and a few everyday baking ingredients.
The key to successful gluten-free scones is choosing the right flour blend, adding liquid gradually, keeping the butter cold, and handling the dough gently. These small details help create a tender texture without making the dough difficult to shape.
Serve them warm with butter, jam, or cream for breakfast or afternoon tea. You can also prepare a batch ahead of time and freeze the extras, making it easy to enjoy a homemade gluten-free treat whenever you like.
Recipe Card: Gluten-Free Fruit Scones
Prep Time: 15 minutes
Cook Time: 15–20 minutes
Total Time: Approximately 30–35 minutes
Yield: 8 medium scones
Course: Breakfast, Snack, Afternoon Tea
Cuisine: British-inspired
Diet: Gluten-free
Ingredients
- 2 cups gluten-free plain flour blend
- 2 teaspoons gluten-free baking powder
- 3 tablespoons granulated sugar
- ¼ teaspoon salt
- 4 tablespoons cold unsalted butter, cubed
- ¾ cup milk, plus extra if needed
- 1 large egg, beaten
- ½ cup raisins or sultanas
- ½ teaspoon vanilla extract, optional
- 1 tablespoon milk or beaten egg, for brushing
Instructions
- Preheat the oven to 400°F (200°C), or 180°C fan-assisted, and line a baking tray with parchment paper.
- Combine the gluten-free flour, baking powder, sugar, and salt in a large bowl.
- Rub in the cold butter until the mixture resembles breadcrumbs.
- Stir in the raisins or sultanas.
- Mix the milk, beaten egg, and vanilla extract in a separate bowl.
- Gradually add most of the liquid to the dry ingredients and mix gently until a soft dough forms.
- Pat the dough into a disc about 1 inch thick on a lightly floured surface.
- Cut into 8 scones and place them on the prepared tray.
- Brush the tops with milk or beaten egg.
- Bake for 15–20 minutes, until risen and lightly golden.
- Cool slightly before transferring to a wire rack.
- Serve warm or at room temperature with butter, jam, or cream.
Estimated Nutrition
Approximate values per scone, assuming 8 servings:
- Calories: 220–270
- Protein: 4–6 g
- Fat: 7–10 g
- Total Carbohydrates: 32–40 g
- Fiber: 1–3 g
- Sugar: 7–11 g
Nutrition will vary depending on the gluten-free flour blend, milk, dried fruit, and portion size. Calculate the values using your exact ingredients before publishing.
SEO Details
SEO Title: Gluten-Free Fruit Scones – Easy, Soft, and Buttery
Meta Description: Bake easy Gluten-Free Fruit Scones with raisins, butter, and a tender golden crumb. Perfect for afternoon tea, breakfast, or a homemade snack.
Suggested URL Slug: gluten-free-fruit-scones
Focus Keyword: Gluten-Free Fruit Scones
Related Keywords: Easy Gluten-Free Scones, Gluten-Free Raisin Scones, Gluten-Free Afternoon Tea Recipes, Gluten-Free Baking, Homemade Fruit Scones
Here’s a complete SEO-friendly recipe article for your website featuring Gluten-Free Fruit Scones — tender, golden scones packed with sweet dried fruit and perfect for breakfast, afternoon tea, or a cozy snack.
Gluten-Free Fruit Scones – Easy, Soft, and Buttery
Gluten-Free Fruit Scones are a delicious homemade treat with a lightly golden exterior, a tender center, and sweet pieces of dried fruit in every bite. They are perfect for afternoon tea, weekend breakfasts, brunch gatherings, or whenever you want a simple baked treat to enjoy with your favorite hot drink. Made with gluten-free flour, butter, milk, and dried fruit, these scones offer a classic bakery-style experience without traditional wheat flour.
One of the best things about this recipe is that it uses straightforward ingredients and a simple mixing method. There is no yeast, no lengthy rising time, and no complicated baking technique. You simply combine the dry ingredients, rub in the butter, add the milk and fruit, shape the dough, and bake until the scones are lightly golden.
The dried fruit adds natural sweetness and a pleasant chewy texture, while the butter helps create a rich flavor. A little milk brings the dough together, and baking powder gives the scones a light rise. The result is a comforting treat that tastes wonderful served slightly warm with butter, jam, or cream.
Whether you follow a gluten-free diet or are baking for someone who avoids gluten, these Gluten-Free Fruit Scones are a lovely addition to your recipe collection.
Why You Will Love These Gluten-Free Fruit Scones
Gluten-Free Baking: This recipe uses a gluten-free flour blend instead of regular wheat flour, making it suitable for a gluten-free menu when all ingredients are verified gluten-free.
Sweet Fruit in Every Bite: Raisins or sultanas add sweetness and chewy texture without requiring a large amount of additional sugar.
Simple Ingredients: You can prepare these scones with common baking ingredients available in most supermarkets.
Easy to Make: The dough comes together quickly, making this recipe suitable for beginner bakers.
Perfect for Afternoon Tea: Serve the scones with tea, coffee, jam, or cream for a traditional-style treat.
Freezer-Friendly: Bake a batch ahead of time and freeze the cooled scones for convenient snacks later.
Ingredients for Gluten-Free Fruit Scones
The following ingredients make approximately 8 medium-sized scones.
Dry Ingredients
- 2 cups gluten-free plain flour blend
- 2 teaspoons gluten-free baking powder
- 3 tablespoons granulated sugar
- ¼ teaspoon salt
Wet Ingredients
- 4 tablespoons cold unsalted butter, cut into small cubes
- ¾ cup milk, plus a little extra if needed
- 1 large egg, beaten
Fruit
- ½ cup raisins or sultanas
- ½ teaspoon vanilla extract, optional
For the Tops
- 1 tablespoon milk or beaten egg, for brushing
- A little extra granulated sugar, optional
Ingredient note: Use a gluten-free flour blend designed for baking. Some blends contain xanthan gum, which can help provide structure. If your blend does not contain a binder, the texture may be more fragile, so follow the flour manufacturer’s guidance.
How to Make Gluten-Free Fruit Scones
Step 1: Preheat the Oven
Preheat your oven to 400°F (200°C), or 180°C for a fan-assisted oven. Line a baking tray with parchment paper.
Preparing the tray before mixing helps you transfer the shaped scones quickly. A properly heated oven encourages the scones to rise and develop a lightly golden exterior.
Measure the ingredients before you begin, and make sure the butter is cold. Cold butter helps create a tender texture and prevents the dough from becoming greasy during mixing.
Step 2: Combine the Dry Ingredients
Place the gluten-free flour, baking powder, sugar, and salt in a large mixing bowl. Stir until everything is evenly distributed.
Mixing the dry ingredients thoroughly helps the baking powder work evenly throughout the dough. This is particularly important when using gluten-free flour, because the texture can become dense if the ingredients are not properly combined.
If your flour blend contains xanthan gum or another binder, check the package instructions before adding any extra.
Step 3: Rub in the Cold Butter
Add the cold butter cubes to the flour mixture. Using your fingertips, rub the butter into the flour until the mixture resembles fine breadcrumbs, with a few small pieces of butter remaining.
Work quickly to keep the butter cool. Avoid squeezing the mixture into a solid mass.
This technique helps create a tender crumb when the scones bake. Small pieces of butter can melt in the oven and contribute to a softer texture.
Step 4: Add the Dried Fruit
Stir the raisins or sultanas into the flour and butter mixture. Separate any fruit pieces that are stuck together so they distribute evenly.
If the dried fruit is very hard, you can soak it briefly in warm water, then drain and pat it completely dry before adding it to the dough. This helps soften the fruit without adding too much moisture.
You can also use a mixture of raisins and sultanas for a more varied flavor.
Step 5: Mix the Wet Ingredients
In a separate bowl, combine the milk, beaten egg, and vanilla extract if using.
Make a well in the center of the dry ingredients and gradually pour in most of the liquid mixture. Keep a small amount aside in case the dough needs additional moisture.
Stir gently with a spoon or spatula until the ingredients begin to form a soft dough. Gluten-free flour blends absorb liquid differently, so you may not need every drop of the milk mixture.
Step 6: Bring the Dough Together
Use your hands or a spatula to bring the mixture together gently. The dough should be soft and slightly tacky, but it should still hold its shape.
If it feels too dry or crumbly, add a little extra milk, one teaspoon at a time. If it is excessively sticky, let it rest for a few minutes so the flour can absorb some moisture. Add only a small amount of extra flour if necessary.
Avoid overworking the dough. Gluten-free dough does not need the same kneading process as traditional bread dough, and excessive handling can make the scones dense.
Step 7: Shape the Dough
Lightly dust your work surface with gluten-free flour. Transfer the dough onto the surface and gently pat it into a round disc approximately 1 inch thick.
Do not roll the dough too thin. A thicker disc helps create taller scones with soft centers.
Use a round cookie cutter, approximately 2–2½ inches wide, to cut out the scones. Press the cutter straight down rather than twisting it, which can help the edges rise more evenly.
Gather any leftover dough gently, reshape it, and cut out additional scones. Handle the dough as little as possible.
Step 8: Arrange and Brush the Scones
Place the shaped scones on the prepared baking tray, leaving a little space between each one.
Brush the tops lightly with milk or beaten egg. Milk encourages a gentle golden color, while egg wash usually creates a deeper shine.
If you like a slightly sweeter top, sprinkle a small pinch of granulated sugar over each scone.
Be careful not to let the glaze drip heavily down the sides, as this can affect how the edges bake.
Step 9: Bake Until Golden
Bake for approximately 15–20 minutes, or until the scones have risen and their tops are lightly golden.
The exact baking time depends on the size of the scones, the flour blend, and your oven. Smaller scones may cook faster, while larger ones may need a few extra minutes.
Check the undersides as well. They should be lightly golden, and the centers should no longer look wet or underbaked.
Avoid baking for too long, as gluten-free scones can become dry if too much moisture is lost.
Step 10: Cool and Serve
Remove the tray from the oven and let the scones rest for several minutes before transferring them to a wire rack.
Gluten-free scones can be more delicate while hot, so allowing them to cool slightly helps them hold their shape.
Serve warm or at room temperature with butter, jam, or cream. For the best texture, enjoy them on the day they are baked.
Tips for the Best Gluten-Free Fruit Scones
Choose a Suitable Flour Blend
A gluten-free flour blend formulated for cakes, biscuits, or scones is generally a better choice than a single gluten-free flour. Different blends absorb liquid differently, so adjust the milk gradually.
Keep the Butter Cold
Cold butter helps create a tender texture. If the butter becomes too soft during preparation, chill the mixture briefly before adding the liquid.
Do Not Add All the Milk at Once
Start with most of the liquid and add more only if needed. This prevents the dough from becoming too wet and difficult to shape.
Avoid Overworking the Dough
Handle the dough gently and stop mixing as soon as it comes together. Too much handling can produce heavy scones.
Shape the Dough Thickly
A disc about 1 inch thick helps create a taller result. If the dough is pressed too thin, the scones may turn out flatter.
Use a Sharp Cutter
Press the cutter straight down without twisting. This helps keep the edges neat and may encourage a more even rise.
Measure Carefully
Gluten-free baking is sensitive to changes in moisture and flour quantities. Measuring ingredients accurately helps produce more consistent results.
Variations and Substitutions
Mixed Fruit Scones
Replace some or all of the raisins with sultanas or another dried fruit suitable for baking. Keep the total quantity close to ½ cup so the dough maintains a workable texture.
Orange and Fruit Scones
Add a little finely grated orange zest to the dry ingredients. Orange pairs beautifully with raisins and sultanas and gives the scones a fresh aroma.
Cinnamon Fruit Scones
Add ½ teaspoon of ground cinnamon to the flour mixture for a warmer flavor. This variation is especially enjoyable during cooler weather.
Lemon Fruit Scones
Add finely grated lemon zest and a small amount of vanilla extract. The citrus flavor complements the dried fruit without overpowering the buttery dough.
Dairy-Free Gluten-Free Scones
Replace the butter with a suitable firm dairy-free baking alternative and use an unsweetened plant-based milk. Choose products labeled gluten-free where necessary. The texture may vary depending on the substitutions.
Reduced-Sugar Scones
You can reduce the added sugar slightly because dried fruit already contributes sweetness. Keep in mind that sugar affects flavor, browning, and texture, so large reductions may change the final result.
Fresh Fruit Variation
Fresh fruit adds extra moisture and can make the dough harder to handle. If using fresh fruit, choose small, firm pieces and reduce other liquid slightly if necessary. Dried fruit is generally more reliable for this recipe.
What to Serve with Gluten-Free Fruit Scones
These scones are delicious with a variety of sweet toppings and drinks.
Butter: Spread a little butter over a warm scone for a simple, comforting snack.
Jam: Strawberry, raspberry, or apricot jam adds sweetness and fruity flavor.
Clotted Cream or Whipped Cream: For a more traditional afternoon-tea presentation, serve with cream and a little jam.
Greek Yogurt: Plain Greek yogurt provides a creamy accompaniment and adds protein to the snack.
Tea or Coffee: A cup of black tea, herbal tea, or coffee pairs beautifully with the buttery texture.
Fresh Berries: Serve with strawberries, raspberries, or blueberries for a fresh contrast to the dried fruit.
If you are preparing an afternoon-tea platter, arrange the scones alongside fresh fruit and a selection of spreads.
How to Store Gluten-Free Fruit Scones
At Room Temperature: Allow the scones to cool completely, then place them in an airtight container. They are best enjoyed within 1–2 days, as gluten-free baked goods can dry out more quickly than traditional versions.
In the Refrigerator: Refrigeration is usually unnecessary for plain scones without perishable fillings or toppings. If you add cream or another perishable topping, refrigerate it separately or follow appropriate food-safety guidance.
In the Freezer: Freeze completely cooled scones in a freezer-safe container or bag for up to 2 months for best quality. Separate them with parchment paper if stacking.
Reheating: Warm a scone in an oven preheated to 300°F (150°C) for approximately 5–8 minutes, or until warmed through. You can also use a microwave for a few seconds, although the texture will be softer rather than crisp.
For the best result, freeze the scones soon after cooling and thaw only the amount you plan to eat.
Frequently Asked Questions
Are Gluten-Free Fruit Scones Suitable for People with Coeliac Disease?
They can be suitable when all ingredients are gluten-free and cross-contact is avoided. Use certified or clearly labeled gluten-free flour and baking powder where appropriate, and prepare the recipe with clean equipment and surfaces.
Why Are My Gluten-Free Scones Crumbly?
The dough may be too dry, or the flour blend may lack enough binding ingredients. Add liquid gradually until the dough holds together, and check whether your flour blend already contains xanthan gum or another binder.
Why Did My Scones Not Rise?
Possible causes include old baking powder, dough that was pressed too thin, or a flour blend that behaves differently from the one intended for the recipe. Check the freshness of your baking powder and shape the dough into a thick disc.
Can I Make the Dough Ahead of Time?
For the best rise and texture, shape and bake the scones shortly after mixing. You can measure the dry ingredients and prepare the dried fruit ahead of time. Alternatively, freeze the shaped unbaked scones and bake them from frozen, allowing extra time and checking that the centers are cooked through.
Can I Use Self-Raising Gluten-Free Flour?
Yes, provided it is a gluten-free self-raising blend. Check whether it already contains a raising agent and adjust the additional baking powder accordingly to avoid adding too much.
Can I Make These Scones Without Eggs?
The egg contributes moisture and structure and can also be used for brushing the tops. Omitting it may change the texture. For an egg-free version, use a recipe tested with an appropriate egg substitute and adjust the liquid as needed.
Can I Use Fresh Fruit Instead of Dried Fruit?
You can experiment with small pieces of fresh fruit, but they add more moisture and may make the dough softer. Dried fruit is the more reliable option for maintaining the traditional scone texture.
How Can I Tell When the Scones Are Done?
The scones should have risen, look lightly golden, and feel set on the outside. The bottoms should be lightly colored, and the centers should not appear wet or doughy.
Final Thoughts
Gluten-Free Fruit Scones are a comforting homemade bake with a golden exterior, a soft center, and sweet dried fruit throughout. They are easy to prepare with a gluten-free flour blend and a few everyday baking ingredients.
The key to successful gluten-free scones is choosing the right flour blend, adding liquid gradually, keeping the butter cold, and handling the dough gently. These small details help create a tender texture without making the dough difficult to shape.
Serve them warm with butter, jam, or cream for breakfast or afternoon tea. You can also prepare a batch ahead of time and freeze the extras, making it easy to enjoy a homemade gluten-free treat whenever you like.
Recipe Card: Gluten-Free Fruit Scones
Prep Time: 15 minutes
Cook Time: 15–20 minutes
Total Time: Approximately 30–35 minutes
Yield: 8 medium scones
Course: Breakfast, Snack, Afternoon Tea
Cuisine: British-inspired
Diet: Gluten-free
Ingredients
- 2 cups gluten-free plain flour blend
- 2 teaspoons gluten-free baking powder
- 3 tablespoons granulated sugar
- ¼ teaspoon salt
- 4 tablespoons cold unsalted butter, cubed
- ¾ cup milk, plus extra if needed
- 1 large egg, beaten
- ½ cup raisins or sultanas
- ½ teaspoon vanilla extract, optional
- 1 tablespoon milk or beaten egg, for brushing
Instructions
- Preheat the oven to 400°F (200°C), or 180°C fan-assisted, and line a baking tray with parchment paper.
- Combine the gluten-free flour, baking powder, sugar, and salt in a large bowl.
- Rub in the cold butter until the mixture resembles breadcrumbs.
- Stir in the raisins or sultanas.
- Mix the milk, beaten egg, and vanilla extract in a separate bowl.
- Gradually add most of the liquid to the dry ingredients and mix gently until a soft dough forms.
- Pat the dough into a disc about 1 inch thick on a lightly floured surface.
- Cut into 8 scones and place them on the prepared tray.
- Brush the tops with milk or beaten egg.
- Bake for 15–20 minutes, until risen and lightly golden.
- Cool slightly before transferring to a wire rack.
- Serve warm or at room temperature with butter, jam, or cream.
Estimated Nutrition
Approximate values per scone, assuming 8 servings:
- Calories: 220–270
- Protein: 4–6 g
- Fat: 7–10 g
- Total Carbohydrates: 32–40 g
- Fiber: 1–3 g
- Sugar: 7–11 g
Nutrition will vary depending on the gluten-free flour blend, milk, dried fruit, and portion size. Calculate the values using your exact ingredients before publishing.
SEO Details
SEO Title: Gluten-Free Fruit Scones – Easy, Soft, and Buttery
Meta Description: Bake easy Gluten-Free Fruit Scones with raisins, butter, and a tender golden crumb. Perfect for afternoon tea, breakfast, or a homemade snack.
Suggested URL Slug: gluten-free-fruit-scones
Focus Keyword: Gluten-Free Fruit Scones
Related Keywords: Easy Gluten-Free Scones, Gluten-Free Raisin Scones, Gluten-Free Afternoon Tea Recipes, Gluten-Free Baking, Homemade Fruit Scones
Correct the egg and ingredient measurementsRemove repeated explanations throughoutHere’s a complete SEO-friendly recipe article for your website featuring Gluten-Free Fruit Scones — tender, golden scones packed with sweet dried fruit and perfect for breakfast, afternoon tea, or a cozy snack.
Gluten-Free Fruit Scones – Easy, Soft, and Buttery
Gluten-Free Fruit Scones are a delicious homemade treat with a lightly golden exterior, a tender center, and sweet pieces of dried fruit in every bite. They are perfect for afternoon tea, weekend breakfasts, brunch gatherings, or whenever you want a simple baked treat to enjoy with your favorite hot drink. Made with gluten-free flour, butter, milk, and dried fruit, these scones offer a classic bakery-style experience without traditional wheat flour.
One of the best things about this recipe is that it uses straightforward ingredients and a simple mixing method. There is no yeast, no lengthy rising time, and no complicated baking technique. You simply combine the dry ingredients, rub in the butter, add the milk and fruit, shape the dough, and bake until the scones are lightly golden.
The dried fruit adds natural sweetness and a pleasant chewy texture, while the butter helps create a rich flavor. A little milk brings the dough together, and baking powder gives the scones a light rise. The result is a comforting treat that tastes wonderful served slightly warm with butter, jam, or cream.
Whether you follow a gluten-free diet or are baking for someone who avoids gluten, these Gluten-Free Fruit Scones are a lovely addition to your recipe collection.
Why You Will Love These Gluten-Free Fruit Scones
Gluten-Free Baking: This recipe uses a gluten-free flour blend instead of regular wheat flour, making it suitable for a gluten-free menu when all ingredients are verified gluten-free.
Sweet Fruit in Every Bite: Raisins or sultanas add sweetness and chewy texture without requiring a large amount of additional sugar.
Simple Ingredients: You can prepare these scones with common baking ingredients available in most supermarkets.
Easy to Make: The dough comes together quickly, making this recipe suitable for beginner bakers.
Perfect for Afternoon Tea: Serve the scones with tea, coffee, jam, or cream for a traditional-style treat.
Freezer-Friendly: Bake a batch ahead of time and freeze the cooled scones for convenient snacks later.
Ingredients for Gluten-Free Fruit Scones
The following ingredients make approximately 8 medium-sized scones.
Dry Ingredients
- 2 cups gluten-free plain flour blend
- 2 teaspoons gluten-free baking powder
- 3 tablespoons granulated sugar
- ¼ teaspoon salt
Wet Ingredients
- 4 tablespoons cold unsalted butter, cut into small cubes
- ¾ cup milk, plus a little extra if needed
- 1 large egg, beaten
Fruit
- ½ cup raisins or sultanas
- ½ teaspoon vanilla extract, optional
For the Tops
- 1 tablespoon milk or beaten egg, for brushing
- A little extra granulated sugar, optional
Ingredient note: Use a gluten-free flour blend designed for baking. Some blends contain xanthan gum, which can help provide structure. If your blend does not contain a binder, the texture may be more fragile, so follow the flour manufacturer’s guidance.
How to Make Gluten-Free Fruit Scones
Step 1: Preheat the Oven
Preheat your oven to 400°F (200°C), or 180°C for a fan-assisted oven. Line a baking tray with parchment paper.
Preparing the tray before mixing helps you transfer the shaped scones quickly. A properly heated oven encourages the scones to rise and develop a lightly golden exterior.
Measure the ingredients before you begin, and make sure the butter is cold. Cold butter helps create a tender texture and prevents the dough from becoming greasy during mixing.
Step 2: Combine the Dry Ingredients
Place the gluten-free flour, baking powder, sugar, and salt in a large mixing bowl. Stir until everything is evenly distributed.
Mixing the dry ingredients thoroughly helps the baking powder work evenly throughout the dough. This is particularly important when using gluten-free flour, because the texture can become dense if the ingredients are not properly combined.
If your flour blend contains xanthan gum or another binder, check the package instructions before adding any extra.
Step 3: Rub in the Cold Butter
Add the cold butter cubes to the flour mixture. Using your fingertips, rub the butter into the flour until the mixture resembles fine breadcrumbs, with a few small pieces of butter remaining.
Work quickly to keep the butter cool. Avoid squeezing the mixture into a solid mass.
This technique helps create a tender crumb when the scones bake. Small pieces of butter can melt in the oven and contribute to a softer texture.
Step 4: Add the Dried Fruit
Stir the raisins or sultanas into the flour and butter mixture. Separate any fruit pieces that are stuck together so they distribute evenly.
If the dried fruit is very hard, you can soak it briefly in warm water, then drain and pat it completely dry before adding it to the dough. This helps soften the fruit without adding too much moisture.
You can also use a mixture of raisins and sultanas for a more varied flavor.
Step 5: Mix the Wet Ingredients
In a separate bowl, combine the milk, beaten egg, and vanilla extract if using.
Make a well in the center of the dry ingredients and gradually pour in most of the liquid mixture. Keep a small amount aside in case the dough needs additional moisture.
Stir gently with a spoon or spatula until the ingredients begin to form a soft dough. Gluten-free flour blends absorb liquid differently, so you may not need every drop of the milk mixture.
Step 6: Bring the Dough Together
Use your hands or a spatula to bring the mixture together gently. The dough should be soft and slightly tacky, but it should still hold its shape.
If it feels too dry or crumbly, add a little extra milk, one teaspoon at a time. If it is excessively sticky, let it rest for a few minutes so the flour can absorb some moisture. Add only a small amount of extra flour if necessary.
Avoid overworking the dough. Gluten-free dough does not need the same kneading process as traditional bread dough, and excessive handling can make the scones dense.
Step 7: Shape the Dough
Lightly dust your work surface with gluten-free flour. Transfer the dough onto the surface and gently pat it into a round disc approximately 1 inch thick.
Do not roll the dough too thin. A thicker disc helps create taller scones with soft centers.
Use a round cookie cutter, approximately 2–2½ inches wide, to cut out the scones. Press the cutter straight down rather than twisting it, which can help the edges rise more evenly.
Gather any leftover dough gently, reshape it, and cut out additional scones. Handle the dough as little as possible.
Step 8: Arrange and Brush the Scones
Place the shaped scones on the prepared baking tray, leaving a little space between each one.
Brush the tops lightly with milk or beaten egg. Milk encourages a gentle golden color, while egg wash usually creates a deeper shine.
If you like a slightly sweeter top, sprinkle a small pinch of granulated sugar over each scone.
Be careful not to let the glaze drip heavily down the sides, as this can affect how the edges bake.
Step 9: Bake Until Golden
Bake for approximately 15–20 minutes, or until the scones have risen and their tops are lightly golden.
The exact baking time depends on the size of the scones, the flour blend, and your oven. Smaller scones may cook faster, while larger ones may need a few extra minutes.
Check the undersides as well. They should be lightly golden, and the centers should no longer look wet or underbaked.
Avoid baking for too long, as gluten-free scones can become dry if too much moisture is lost.
Step 10: Cool and Serve
Remove the tray from the oven and let the scones rest for several minutes before transferring them to a wire rack.
Gluten-free scones can be more delicate while hot, so allowing them to cool slightly helps them hold their shape.
Serve warm or at room temperature with butter, jam, or cream. For the best texture, enjoy them on the day they are baked.
Tips for the Best Gluten-Free Fruit Scones
Choose a Suitable Flour Blend
A gluten-free flour blend formulated for cakes, biscuits, or scones is generally a better choice than a single gluten-free flour. Different blends absorb liquid differently, so adjust the milk gradually.
Keep the Butter Cold
Cold butter helps create a tender texture. If the butter becomes too soft during preparation, chill the mixture briefly before adding the liquid.
Do Not Add All the Milk at Once
Start with most of the liquid and add more only if needed. This prevents the dough from becoming too wet and difficult to shape.
Avoid Overworking the Dough
Handle the dough gently and stop mixing as soon as it comes together. Too much handling can produce heavy scones.
Shape the Dough Thickly
A disc about 1 inch thick helps create a taller result. If the dough is pressed too thin, the scones may turn out flatter.
Use a Sharp Cutter
Press the cutter straight down without twisting. This helps keep the edges neat and may encourage a more even rise.
Measure Carefully
Gluten-free baking is sensitive to changes in moisture and flour quantities. Measuring ingredients accurately helps produce more consistent results.
Variations and Substitutions
Mixed Fruit Scones
Replace some or all of the raisins with sultanas or another dried fruit suitable for baking. Keep the total quantity close to ½ cup so the dough maintains a workable texture.
Orange and Fruit Scones
Add a little finely grated orange zest to the dry ingredients. Orange pairs beautifully with raisins and sultanas and gives the scones a fresh aroma.
Cinnamon Fruit Scones
Add ½ teaspoon of ground cinnamon to the flour mixture for a warmer flavor. This variation is especially enjoyable during cooler weather.
Lemon Fruit Scones
Add finely grated lemon zest and a small amount of vanilla extract. The citrus flavor complements the dried fruit without overpowering the buttery dough.
Dairy-Free Gluten-Free Scones
Replace the butter with a suitable firm dairy-free baking alternative and use an unsweetened plant-based milk. Choose products labeled gluten-free where necessary. The texture may vary depending on the substitutions.
Reduced-Sugar Scones
You can reduce the added sugar slightly because dried fruit already contributes sweetness. Keep in mind that sugar affects flavor, browning, and texture, so large reductions may change the final result.
Fresh Fruit Variation
Fresh fruit adds extra moisture and can make the dough harder to handle. If using fresh fruit, choose small, firm pieces and reduce other liquid slightly if necessary. Dried fruit is generally more reliable for this recipe.
What to Serve with Gluten-Free Fruit Scones
These scones are delicious with a variety of sweet toppings and drinks.
Butter: Spread a little butter over a warm scone for a simple, comforting snack.
Jam: Strawberry, raspberry, or apricot jam adds sweetness and fruity flavor.
Clotted Cream or Whipped Cream: For a more traditional afternoon-tea presentation, serve with cream and a little jam.
Greek Yogurt: Plain Greek yogurt provides a creamy accompaniment and adds protein to the snack.
Tea or Coffee: A cup of black tea, herbal tea, or coffee pairs beautifully with the buttery texture.
Fresh Berries: Serve with strawberries, raspberries, or blueberries for a fresh contrast to the dried fruit.
If you are preparing an afternoon-tea platter, arrange the scones alongside fresh fruit and a selection of spreads.
How to Store Gluten-Free Fruit Scones
At Room Temperature: Allow the scones to cool completely, then place them in an airtight container. They are best enjoyed within 1–2 days, as gluten-free baked goods can dry out more quickly than traditional versions.
In the Refrigerator: Refrigeration is usually unnecessary for plain scones without perishable fillings or toppings. If you add cream or another perishable topping, refrigerate it separately or follow appropriate food-safety guidance.
In the Freezer: Freeze completely cooled scones in a freezer-safe container or bag for up to 2 months for best quality. Separate them with parchment paper if stacking.
Reheating: Warm a scone in an oven preheated to 300°F (150°C) for approximately 5–8 minutes, or until warmed through. You can also use a microwave for a few seconds, although the texture will be softer rather than crisp.
For the best result, freeze the scones soon after cooling and thaw only the amount you plan to eat.
Frequently Asked Questions
Are Gluten-Free Fruit Scones Suitable for People with Coeliac Disease?
They can be suitable when all ingredients are gluten-free and cross-contact is avoided. Use certified or clearly labeled gluten-free flour and baking powder where appropriate, and prepare the recipe with clean equipment and surfaces.
Why Are My Gluten-Free Scones Crumbly?
The dough may be too dry, or the flour blend may lack enough binding ingredients. Add liquid gradually until the dough holds together, and check whether your flour blend already contains xanthan gum or another binder.
Why Did My Scones Not Rise?
Possible causes include old baking powder, dough that was pressed too thin, or a flour blend that behaves differently from the one intended for the recipe. Check the freshness of your baking powder and shape the dough into a thick disc.
Can I Make the Dough Ahead of Time?
For the best rise and texture, shape and bake the scones shortly after mixing. You can measure the dry ingredients and prepare the dried fruit ahead of time. Alternatively, freeze the shaped unbaked scones and bake them from frozen, allowing extra time and checking that the centers are cooked through.
Can I Use Self-Raising Gluten-Free Flour?
Yes, provided it is a gluten-free self-raising blend. Check whether it already contains a raising agent and adjust the additional baking powder accordingly to avoid adding too much.
Can I Make These Scones Without Eggs?
The egg contributes moisture and structure and can also be used for brushing the tops. Omitting it may change the texture. For an egg-free version, use a recipe tested with an appropriate egg substitute and adjust the liquid as needed.
Can I Use Fresh Fruit Instead of Dried Fruit?
You can experiment with small pieces of fresh fruit, but they add more moisture and may make the dough softer. Dried fruit is the more reliable option for maintaining the traditional scone texture.
How Can I Tell When the Scones Are Done?
The scones should have risen, look lightly golden, and feel set on the outside. The bottoms should be lightly colored, and the centers should not appear wet or doughy.
Final Thoughts
Gluten-Free Fruit Scones are a comforting homemade bake with a golden exterior, a soft center, and sweet dried fruit throughout. They are easy to prepare with a gluten-free flour blend and a few everyday baking ingredients.
The key to successful gluten-free scones is choosing the right flour blend, adding liquid gradually, keeping the butter cold, and handling the dough gently. These small details help create a tender texture without making the dough difficult to shape.
Serve them warm with butter, jam, or cream for breakfast or afternoon tea. You can also prepare a batch ahead of time and freeze the extras, making it easy to enjoy a homemade gluten-free treat whenever you like.
Recipe Card: Gluten-Free Fruit Scones
Prep Time: 15 minutes
Cook Time: 15–20 minutes
Total Time: Approximately 30–35 minutes
Yield: 8 medium scones
Course: Breakfast, Snack, Afternoon Tea
Cuisine: British-inspired
Diet: Gluten-free
Ingredients
- 2 cups gluten-free plain flour blend
- 2 teaspoons gluten-free baking powder
- 3 tablespoons granulated sugar
- ¼ teaspoon salt
- 4 tablespoons cold unsalted butter, cubed
- ¾ cup milk, plus extra if needed
- 1 large egg, beaten
- ½ cup raisins or sultanas
- ½ teaspoon vanilla extract, optional
- 1 tablespoon milk or beaten egg, for brushing
Instructions
- Preheat the oven to 400°F (200°C), or 180°C fan-assisted, and line a baking tray with parchment paper.
- Combine the gluten-free flour, baking powder, sugar, and salt in a large bowl.
- Rub in the cold butter until the mixture resembles breadcrumbs.
- Stir in the raisins or sultanas.
- Mix the milk, beaten egg, and vanilla extract in a separate bowl.
- Gradually add most of the liquid to the dry ingredients and mix gently until a soft dough forms.
- Pat the dough into a disc about 1 inch thick on a lightly floured surface.
- Cut into 8 scones and place them on the prepared tray.
- Brush the tops with milk or beaten egg.
- Bake for 15–20 minutes, until risen and lightly golden.
- Cool slightly before transferring to a wire rack.
- Serve warm or at room temperature with butter, jam, or cream.
Estimated Nutrition
Approximate values per scone, assuming 8 servings:
- Calories: 220–270
- Protein: 4–6 g
- Fat: 7–10 g
- Total Carbohydrates: 32–40 g
- Fiber: 1–3 g
- Sugar: 7–11 g
Nutrition will vary depending on the gluten-free flour blend, milk, dried fruit, and portion size. Calculate the values using your exact ingredients before publishing.


