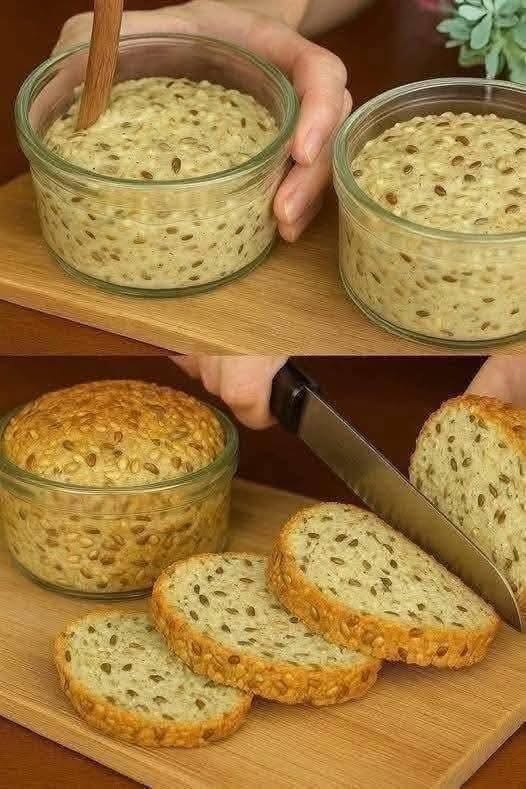
Homemade bread does not have to involve complicated techniques, long ingredient lists, or hours of preparation. This 3-Ingredient Seeded Bread proves that wholesome baking can be both simple and rewarding. Made with a blend of nutritious seeds, rolled oats, and water, this easy bread recipe delivers a hearty loaf that is naturally rich in fiber, plant-based protein, and healthy fats. It is an excellent choice for anyone looking to enjoy homemade bread without using yeast, dairy, eggs, or refined flour. The recipe is especially appealing for busy home cooks because it skips kneading and rising while still producing a satisfying loaf with a pleasantly dense texture. Whether you are following a healthy eating plan, searching for gluten-free bread made with certified gluten-free oats, or simply looking for an easy meal-prep recipe, this homemade seeded bread offers both convenience and outstanding nutrition. Every slice is packed with wholesome goodness, making it suitable for breakfast, lunch, snacks, or as a side with your favorite meals throughout the week.
Why This 3-Ingredient Seeded Bread Is So Popular
Healthy homemade bread recipes have become increasingly popular because many people are searching for simple alternatives to heavily processed store-bought loaves. This easy seeded bread recipe stands out because it relies entirely on natural ingredients that work together to create structure and texture without requiring yeast or complicated baking methods. The combination of oats and seeds forms a hearty loaf with a rich, nutty flavor that complements both sweet and savory toppings. Since there is no kneading or waiting for dough to rise, the preparation is quick and beginner-friendly. The bread is naturally dairy-free and vegan, making it suitable for a wide range of dietary preferences. It is also freezer-friendly, allowing home bakers to prepare one loaf and enjoy it over several weeks. Whether served toasted with nut butter, topped with avocado, or paired with homemade soup, this nutritious bread fits easily into everyday meals while providing lasting energy and valuable nutrients in every serving.
Understanding What Makes This Bread Different
Unlike traditional bread recipes that depend on yeast to create a light, airy texture, this recipe uses the natural binding abilities of seeds and oats to form a firm, sliceable loaf. Chia seeds and flaxseeds absorb water during the resting period, creating a gel-like consistency that holds all the ingredients together without the need for eggs or commercial binders. Rolled oats provide body and texture while contributing a mild, slightly sweet flavor that balances the nuttiness of the seeds. The finished bread has a rustic appearance with a dense yet tender crumb that slices beautifully once completely cooled. Rather than aiming for the softness of sandwich bread, this loaf celebrates wholesome ingredients and natural texture. Its hearty consistency makes it especially satisfying and ideal for open-faced sandwiches, healthy breakfasts, and nutritious snacks. The recipe demonstrates that simple pantry ingredients can create a delicious homemade loaf without relying on artificial additives or complicated preparation techniques.
The Three Simple Ingredients That Make This Bread Special
One of the greatest strengths of this recipe is its simplicity. Only three main ingredients are needed, yet each one plays an essential role in creating a nutritious and flavorful loaf. Mixed seeds provide healthy fats, fiber, plant protein, vitamins, and minerals while adding a pleasant crunch throughout the bread. The mixture may include sunflower seeds, pumpkin seeds, chia seeds, flaxseeds, and sesame seeds, creating layers of texture and flavor. Rolled oats act as the primary structure of the loaf once they are lightly processed into a coarse flour. They also contribute complex carbohydrates that provide steady energy and help create a satisfying bite. Water may seem like the simplest ingredient, but it performs one of the most important functions by activating the chia and flaxseeds. As these seeds absorb moisture, they produce a natural gel that binds the entire loaf together. This clever combination of wholesome ingredients eliminates the need for yeast, eggs, butter, or refined flour while producing a delicious and nourishing homemade bread.
Nutritional Benefits of Every Ingredient
Every ingredient in this recipe contributes valuable nutrients that support a balanced diet. Sunflower seeds are naturally rich in vitamin E, healthy fats, magnesium, and plant protein, helping provide lasting energy throughout the day. Pumpkin seeds supply iron, zinc, antioxidants, and additional protein, making them an excellent addition to healthy baking. Chia seeds are widely recognized for their impressive fiber content along with omega-3 fatty acids, calcium, and protein, while flaxseeds contribute lignans, healthy fats, and even more dietary fiber. Sesame seeds provide calcium, copper, iron, and a pleasant nutty flavor that enhances the overall taste of the loaf. Rolled oats bring complex carbohydrates, B vitamins, minerals, and soluble fiber, which help support digestion and promote longer-lasting fullness. Finally, water activates the natural gelling properties of chia and flaxseeds, allowing the ingredients to bind together without additional additives. Together, these wholesome ingredients create a nutrient-dense bread that offers far more nutritional value than many commercially produced loaves while remaining incredibly easy to prepare at home.
Equipment You’ll Need Before You Begin
One reason this recipe is ideal for beginner bakers is that it requires only a few basic kitchen tools. A large mixing bowl provides enough space to combine the oats, seeds, and water evenly without making a mess. A blender or food processor is used to pulse the rolled oats into a coarse flour, giving the bread its structure while preserving a pleasantly rustic texture. Measuring cups ensure the ingredients remain properly balanced, which is important for achieving the correct consistency. A sturdy spoon or silicone spatula helps mix the ingredients thoroughly so every seed is evenly coated with water. A standard loaf pan lined with parchment paper prevents sticking and makes it easy to lift the finished bread from the pan after baking. Finally, a reliable oven set to the correct temperature allows the loaf to bake evenly until it develops a firm texture and beautifully golden crust. Having these simple tools prepared before you begin makes the baking process smooth, organized, and enjoyable while helping produce consistent results every time.
The first step in making this healthy homemade bread is preparing the rolled oats correctly. Place the rolled oats into a blender or food processor and pulse them several times until they resemble a coarse flour. Avoid blending them into an extremely fine powder because a slightly textured consistency helps create the rustic character that makes this loaf unique. The coarse oat flour provides structure while allowing small oat pieces to remain throughout the bread, creating a pleasant bite after baking. Since oats absorb moisture gradually, they also contribute to the loaf’s firm yet tender texture. Using rolled oats rather than instant oats helps maintain the right consistency and ensures the bread holds together well after cooling. This simple preparation step takes only a few minutes but has a significant impact on the finished loaf, producing slices that are sturdy enough for sandwiches while still remaining soft enough to enjoy with your favorite spreads and toppings.
Combining the Dry Ingredients Evenly
After preparing the oats, transfer the coarse oat flour into a large mixing bowl and add the mixed seeds. Stir the ingredients thoroughly so that every variety of seed is evenly distributed throughout the mixture. Proper mixing is important because it ensures every slice contains a balanced combination of sunflower seeds, pumpkin seeds, chia seeds, flaxseeds, and sesame seeds. Each type of seed contributes its own flavor, texture, and nutritional value, so even distribution creates a more enjoyable eating experience. The oats surround the seeds and help fill the spaces between them, creating a mixture that will later bind together naturally once water is added. Taking a few extra moments to mix everything well before introducing the liquid helps produce a loaf with consistent texture from the first slice to the last. This careful preparation also prevents clumps of individual seeds from forming during baking, resulting in a more attractive and evenly baked loaf.
Adding Water and Creating the Natural Binder
Water may appear to be the simplest ingredient in the recipe, but it performs one of the most essential roles in the entire baking process. Slowly pour the water into the bowl while stirring continuously so every oat and seed becomes evenly coated. At first, the mixture will seem loose and quite wet, which is completely normal. Within a few minutes, the chia seeds and flaxseeds begin absorbing the moisture and gradually form a natural gel. This gel acts as the binding agent that replaces eggs or commercial bread improvers found in many traditional recipes. As the water continues to hydrate the ingredients, the mixture thickens into a sticky dough-like consistency that can easily be transferred into the loaf pan. Ensuring that every seed has absorbed enough moisture creates a stronger structure after baking and helps prevent the finished loaf from crumbling when sliced. This simple chemical process demonstrates how natural ingredients can work together without artificial additives to create a delicious homemade bread.
Allowing the Mixture to Rest Before Baking
Patience is one of the key ingredients in this recipe. Once all the ingredients have been thoroughly mixed, allow the mixture to rest for 30 to 60 minutes before transferring it to the loaf pan. During this resting period, the chia seeds and flaxseeds continue absorbing water and expand significantly, creating the thick, sticky consistency that binds the loaf together. The oats also soften as they absorb moisture, helping improve the final texture after baking. Skipping or shortening this step may result in a loaf that crumbles easily because the natural binding process has not fully developed. By allowing enough time for hydration, the mixture becomes easier to shape and holds together much better during baking. Although waiting may seem unnecessary, this simple step greatly improves the quality of the finished bread and ensures clean slices with a firm but tender texture that is ideal for everyday use.
Preparing the Loaf Pan and Shaping the Bread
While the mixture is resting, prepare the loaf pan by lining it completely with parchment paper. This prevents sticking and makes removing the baked loaf much easier. Once the mixture has thickened, transfer it into the prepared pan using a spoon or silicone spatula. Spread it evenly into the corners before pressing the surface down firmly. Compacting the mixture is an important step because it removes large air pockets and helps the bread hold its shape during baking. Smooth the top with the back of a spoon or spatula to create an even surface that will bake uniformly. Unlike traditional bread dough, this mixture will not rise in the oven, so the shape you create before baking is essentially the shape of the finished loaf. Taking a little extra care while filling the pan results in a neat, evenly baked bread that slices cleanly and looks attractive when served.
Baking the Bread Until Golden and Firm
Preheat the oven to 350°F (175°C) before placing the loaf inside. Bake for approximately 50 to 60 minutes, allowing enough time for the moisture to evaporate while the outside develops a beautiful golden-brown color. As the bread bakes, the oats become firm, the seeds toast gently, and the natural gel formed by the chia and flaxseeds sets into a sturdy structure. The finished loaf should feel firm when lightly pressed on top, and the edges may begin pulling away slightly from the sides of the pan. If the center still feels soft or appears undercooked, continue baking for another five to ten minutes until fully set. Every oven performs slightly differently, so checking near the end of the baking time helps achieve the best results. Proper baking ensures a loaf that slices neatly, holds together well, and has a pleasantly crisp crust with a wholesome, hearty interior.
Cooling Before Slicing
After removing the bread from the oven, allow it to remain in the loaf pan for about 15 minutes before lifting it out using the parchment paper. Transfer the loaf to a wire cooling rack and allow it to cool completely before cutting. Although it may be tempting to slice into the bread while it is still warm, doing so can cause it to crumble because the interior is still setting. As the loaf cools, the natural binders continue to firm up, creating a much stronger structure that makes slicing easier. Complete cooling also improves the flavor and texture, allowing the toasted seeds and oats to develop their full nutty aroma. Using a sharp serrated bread knife helps create clean, even slices without compressing the loaf. This final step requires patience, but it rewards you with beautiful slices that remain intact whether served fresh, toasted, or topped with your favorite healthy ingredients.
Knowing when your homemade seeded bread is fully baked helps ensure the best texture and flavor. A properly baked loaf should have a rich golden-brown color across the top, while the edges begin to pull away slightly from the sides of the loaf pan. When gently pressed, the surface should feel firm rather than soft or spongy. Another useful indicator is the weight of the loaf. As moisture evaporates during baking, the bread becomes lighter and develops a sturdy structure. If you are uncertain whether the center has finished baking, return the loaf to the oven for an additional five to ten minutes. Slightly extending the baking time is far better than removing the bread too early, as underbaked bread can remain wet in the middle and become difficult to slice. Once fully baked and completely cooled, the loaf should cut cleanly without crumbling, revealing a dense interior filled with evenly distributed seeds. Paying attention to these visual and texture cues helps produce consistent, bakery-quality results every time.
Delicious Ways to Serve 3-Ingredient Seeded Bread
One of the greatest advantages of this healthy bread recipe is its versatility. The dense texture and nutty flavor pair beautifully with a wide variety of toppings, making it suitable for every meal of the day. For breakfast, toast a slice until lightly crisp and spread it with peanut butter, almond butter, honey, or your favorite fruit jam for a wholesome start to the morning. At lunchtime, use it as the base for avocado toast or top it with egg salad, tuna salad, or chicken salad for a filling meal. During dinner, serve warm slices alongside homemade soups, vegetable stews, or fresh salads to add extra texture and nutrition to the meal. It also makes an excellent afternoon snack when topped with cottage cheese, Greek yogurt, hummus, or sliced vegetables. Because the bread has a sturdy structure, it supports generous toppings without becoming soggy, making it an excellent choice for open-faced sandwiches and healthy meal preparation throughout the week.
Storage Tips to Keep Your Bread Fresh
Proper storage helps preserve both the flavor and texture of this homemade seeded bread. Once the loaf has cooled completely, place it in an airtight container or wrap it tightly before storing it at room temperature. Under these conditions, it remains fresh for up to three days. If you would like to keep it longer, transfer it to the refrigerator, where it will stay fresh for approximately one week. Make sure the loaf is wrapped well to prevent it from drying out. For long-term storage, slice the bread before freezing and separate each slice with parchment paper if desired. Frozen slices can be stored for up to three months and can be thawed individually whenever needed. Toasting frozen slices directly from the freezer is an easy way to restore their crisp texture and fresh flavor. Following these simple storage methods allows you to prepare one loaf in advance and enjoy healthy homemade bread whenever you need it without sacrificing quality.
Flavor Variations to Customize Your Bread
Although this recipe is wonderfully satisfying in its original form, it can also be adapted with additional flavors to suit different tastes. For an herb-infused loaf, mix dried rosemary, thyme, or oregano into the batter before baking to create a fragrant bread that pairs perfectly with soups and salads. If you enjoy sweeter flavors, a sprinkle of cinnamon combined with raisins or chopped dates creates a naturally sweet breakfast loaf. Those who prefer extra crunch can add chopped almonds, walnuts, or pecans to complement the existing seeds while increasing the nutritional value. A savory version can be made by mixing garlic powder, onion powder, and black pepper into the mixture for a flavorful bread that works beautifully alongside pasta dishes or roasted vegetables. These simple additions allow you to create a variety of homemade breads while preserving the original preparation method. Whether you prefer sweet or savory flavors, this versatile recipe provides endless opportunities for creativity in the kitchen.
Health Benefits of This Homemade Seeded Bread
This wholesome bread is far more than a convenient homemade recipe—it is also packed with nutrients that support overall wellness. The generous amount of dietary fiber supplied by the oats, chia seeds, flaxseeds, and other mixed seeds helps promote healthy digestion while contributing to a longer-lasting feeling of fullness. Healthy fats naturally found in sunflower seeds, pumpkin seeds, flaxseeds, and chia seeds support heart health and provide a valuable source of plant-based energy. The combination of fiber and protein may also help maintain more stable blood sugar levels compared to many refined bread products. In addition, the variety of seeds contributes essential minerals such as magnesium, calcium, iron, copper, and zinc, all of which play important roles in normal body function. Because the recipe contains no refined flour, dairy, or yeast, it fits well into many balanced eating plans. Every slice delivers wholesome nutrition while remaining satisfying, making it an excellent addition to a healthy lifestyle focused on simple, minimally processed foods.
Notes Allow Enough Soaking Time
Do not rush the resting period after adding the water. Giving the mixture at least 30 to 60 minutes allows the chia seeds and flaxseeds to absorb enough moisture to create the natural binder that keeps the loaf together.
Use Fresh Ingredients
Fresh seeds provide better flavor, aroma, and texture than older seeds. If seeds have developed a bitter smell or taste, replace them before baking for the best results.
Cool Completely Before Cutting
Allow the bread to cool fully on a wire rack before slicing. This gives the loaf enough time to firm up, resulting in clean slices that hold together well.
Press the Mixture Firmly into the Pan
Compacting the mixture removes air pockets and creates a loaf with a stronger structure that is less likely to crumble after baking.
Use Certified Gluten-Free Oats if Needed
Although oats are naturally gluten-free, they may come into contact with gluten during processing. If gluten-free bread is required, use certified gluten-free rolled oats.
3-Ingredient Seeded Bread (Healthy, High-Fiber Homemade Bread)
Description
This easy homemade 3-Ingredient Seeded Bread is made with mixed seeds, rolled oats, and water. Naturally rich in fiber, healthy fats, and plant-based protein, this wholesome loaf requires no yeast, no kneading, and no dairy. Perfect for breakfast, sandwiches, snacks, or meal prep, it is a simple recipe that delivers hearty flavor and satisfying texture.
Preparation & Cooking Duration
Preparation Time: 15 minutes
Resting Time: 30–60 minutes
Baking Time: 50–60 minutes
Cooling Time: 30 minutes
Total Time: Approximately 2 hours
Servings
1 loaf (approximately 12 slices)
Ingredients
Mixed Seeds
2 cups mixed seeds
Sunflower seeds
Pumpkin seeds
Chia seeds
Flaxseeds
Sesame seeds
Rolled Oats
2 cups rolled oats
Water
2 cups water
Step-by-Step Instructions
- Preheat the oven to 350°F (175°C).
- Pulse the rolled oats in a blender or food processor until a coarse flour forms.
- Transfer the ground oats to a large mixing bowl.
- Add the mixed seeds and stir until evenly combined.
- Pour in the water and mix thoroughly until all ingredients are evenly hydrated.
- Let the mixture rest for 30–60 minutes until it thickens.
- Line a loaf pan with parchment paper.
- Spoon the mixture into the pan and press it down firmly to remove air pockets.
- Smooth the top evenly using the back of a spoon or spatula.
- Bake for 50–60 minutes, or until the loaf is golden brown and firm.
- Cool in the pan for 15 minutes, then transfer to a wire rack.
- Allow the bread to cool completely before slicing and serving.
- Nutritional Information (Approximate Per Slice)
- Calories: 180
- Protein: 7 g
- Fat: 10 g
- Carbohydrates: 16 g
- Fiber: 5 g


